The short answer
Attach a line to each guy-out loop on the rainfly, run it away from the tent, stake it, then add tension until the fabric stops sagging and flapping. The Appalachian Mountain Club says loops midway up the fly, over a pole, add the most strength. Re-check tension after rain.
Guy lines are the thin cords that come bundled with most tents, and plenty of campers leave them coiled in the stuff sack. They do two jobs: they hold the rainfly off the tent body so condensation and rain stay outside, and they brace the poles against wind and snow load.
Where sources disagree, each source’s number is shown.
What you need
- A tent with a rainfly that has guy-out loops (reinforced loops on the corners and, on most tents, midway up the sides)
- One guy line per loop you plan to use. Many tents ship with lines attached; Greenbelly, a backpacking-food company, notes that “some lines from the manufacturer are very short or poorly tied”, so check yours.
- One stake per line. The AMC points out that “most tents do not come with enough stakes to secure both the tent and guylines”, so count before you leave.
- A way to tighten each line: a plastic or metal slider (tensioner) already on the line, or a taut-line hitch
- Optional: bright or reflective cord, so the lines are easier to see after dark
What each guy-out loop does
Not every loop does the same job. The AMC, a nonprofit outdoor club, describes two purposes: guy lines “keep the rainfly away from the tent body to minimize the potential for leakage”, and they add stability in wind and under snow.
| Loop position | What guying it out does | Source |
|---|---|---|
| Around the bottom of the fly | Pulls the fly away from the tent body, edges and corners so condensation and runoff stay out | AMC |
| Midway up the fly, over a pole | Adds the most strength: “These add the greatest strength to the tent, much more than those around the bottom.” | AMC |
| Middle of a large dome’s fly sides | Stops a noisy flapping panel and lets air circulate under the fly | Offroad Passport forum post |
The AMC adds that guy lines work best when they reinforce the poles, not just the fabric. Most quality tents have Velcro loops on the underside of the fly, directly under the guy-out loops, that fasten to the poles.
How to use tent guy lines, step by step
Pitch the tent and stake its corners first
Tiegear, an Australian retailer of guy ropes and pegs, says to “Start with your tent pitched and staked” and treat guy lines as the finishing touch. Your guy-line stakes are extra: the AMC notes tents often do not include enough stakes for both.
Pick the loops to use
For wind, use the loops midway up the fly, above a pole, and fasten the Velcro loops under the fly around the poles first; the AMC says they are the connection between the guy lines and the pole structure. To keep the fly off the tent body, the AMC says to use the bottom loops too. A forum post by the Offroad Passport site’s administrator advises: “For a small dome tent, guy out the 4 corners at a minimum.”
Attach a line to each loop
Use the pre-tied loop if the line has one. Greenbelly’s founder recommends either “a bowline knot (not adjustable) or two half hitches” to attach to the tent. Either way, first pass the free end of the line through the tent’s guy-out loop, so the finished knot holds the line around that loop. NetKnots gives these bowline steps: lay the rope across your left hand with the free end hanging down and form a small loop in the line in your hand; bring the free end up to and pass it through the eye from the under side; wrap the line around the standing line and back down through the loop; tighten the knot by pulling on the free end while holding the standing line. Its bowline page has an illustration and animation, and AnimatedKnots has a page for two half hitches. Pull on the finished knot to check it holds before you walk away. Slower Hiking, an Australian hiking blog, says lines that come with reputable tent brands “are usually of optimal length”, so shorten them only with a reason.
Lay the line out and choose the stake spot
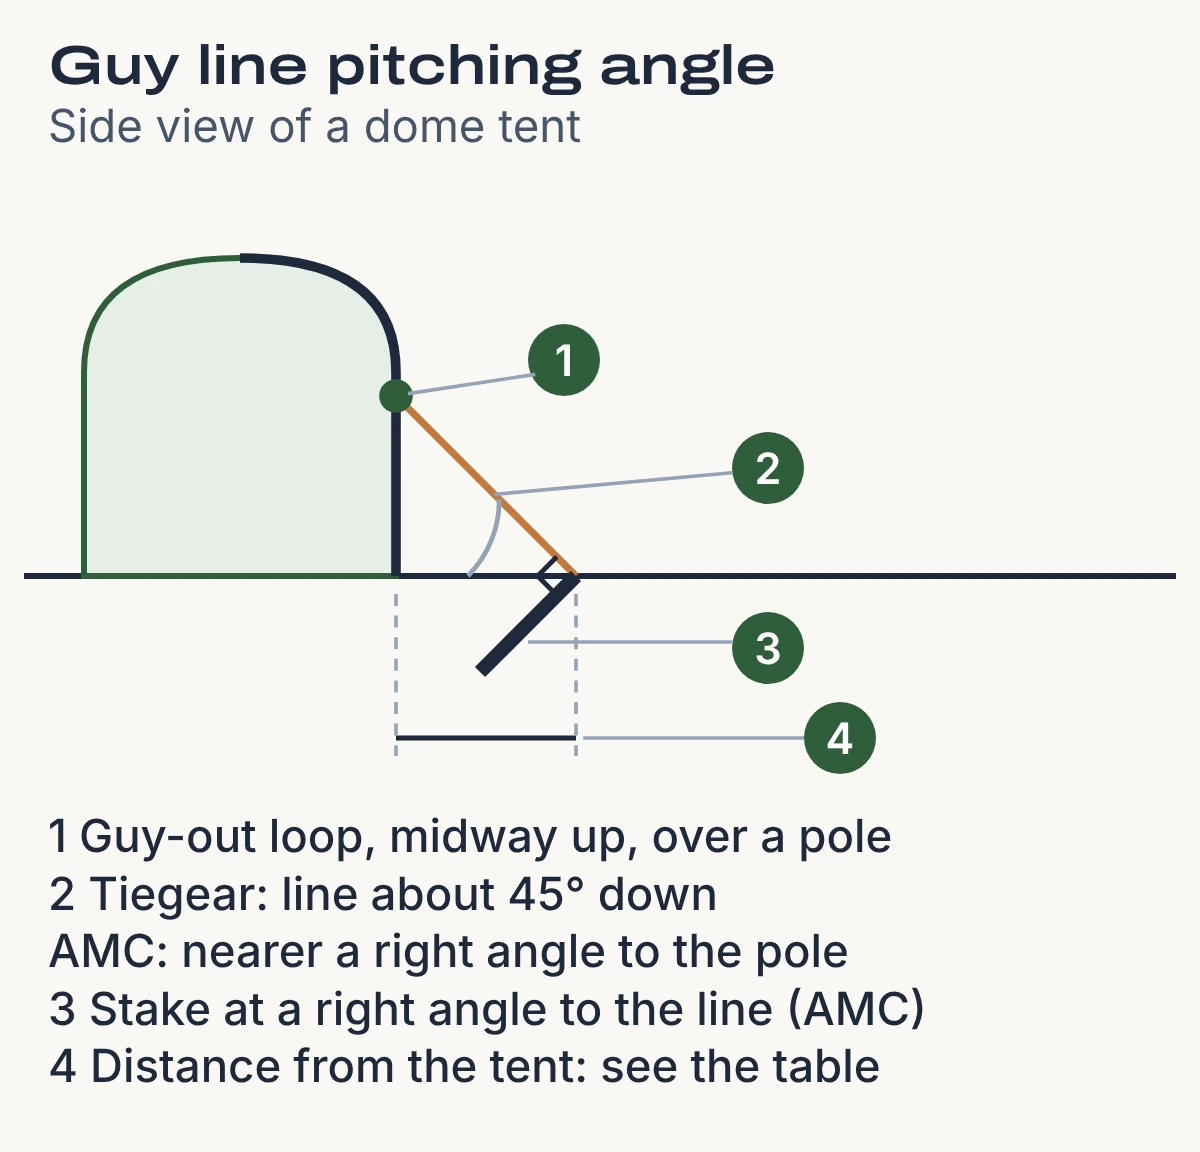
Slower Hiking says to deploy the guyline “at the correct angle from the tent”, which “usually means extending the line of a seam, or exactly out from a corner”. How far out and how steep depends on your source: Tiegear says the line should “extend roughly 45 degrees down from the attachment point” and that “steeper angles provide better downward force, while shallower angles offer more lateral stability”, while the AMC says to set each line “as close to a right angle with the pole as possible” for maximum strength, which means staking farther out. Distances are in the table below. Tripping hazard: the AMC calls guy lines “a significant and all-but-invisible hazard underfoot”, and the forum post warns that a longer run “can make tripping more likely, especially if you have children”. Tiegear advises you to “Position ropes where foot traffic is minimal”.
Drive the stake at a right angle to the line, and hook the line on it
The AMC says to “drive stakes into the ground at a right angle to the guylines to prevent them from pulling out in heavy wind”. The diagram shows the angle. Put the loop at the end of the line over the stake; the forum post says you can “simply tie a loop in the rope to go around the stake”. Stake types and depth for sand, snow and rock are a separate topic.
Tighten with a slider, if your line has one
The Offroad Passport post says a slider can “help you make a loop of any size (in order to set the length of the line)”: make the loop around the stake bigger “so that it just reaches your stake”. To add tension, pull down on the line above the slider, which frees it enough to move; still pulling, slide it “up (towards the tent)”. “This makes the loop bigger, which in effect shortens the line overall (adding tension).” Slide it the other way to loosen.
Or tie a taut-line hitch
NetKnots, a knot-reference site, says campers use this knot on tent guy lines because “the hitch slides freely, yet jams under load, making adjustments to the line easy”. Its steps, tied on the line after it is secured around the stake: make a turn around the stake several feet from the free end; coil the free end twice around the standing line, working back toward the stake; make one additional coil around the standing line on the outside of the coils just made; then tighten the knot and slide it on the standing line to adjust tension. The standing line is the part that runs back to the tent, so the coils go around that line, between the stake and the end of the knot. NetKnots calls the last coil a half hitch (“Half Hitch (step 3)”), and its page shows the knot in an illustration and an animation: follow them when you tie it. NetKnots notes this is the adjustable sliding knot the Boy Scouts of America recommend.
Tension until the fabric stops sagging
Tiegear says to use “enough tension to eliminate fabric sag” and to avoid pulling the tent drum-tight. Look at the fly: it should stand clear of the tent body, with no flapping panels. The forum post is blunt: “A guy-line without some tension is practically useless.”
Make the lines visible
The AMC suggests placing an obvious object, such as your pack, in front of the line, or hanging a shirt over it. It adds that reflective material woven into a line is a minor asset at night.
Re-check after rain and in the morning chill
The AMC warns that “tent fabrics, especially silnylon, sag as they cool and get wet”, and says to “periodically check and re-tension guylines to keep the rainfly taut”.
How far out to stake
The sources give different numbers. Use the line length your tent’s maker supplied as the starting point, and its manual as the last word.
| Source | Source type | What it says |
|---|---|---|
| Offroad Passport post | Forum | Stake “2 to 4 feet” (0.6 to 1.2 m) from the base of the tent; 4 feet is more stable but not always possible and “can make tripping more likely” |
| Tiegear | Australian retailer of guy ropes | Stake “about 6-8 feet” (1.8 to 2.4 m) from the tent; line about 45 degrees down from the attachment point |
| AMC | Outdoor club | Aim for a line as close to a right angle with the pole as possible; securing it far from the tent helps |
| Slower Hiking | Hiking blog | Brand-supplied lines are usually the best length: “Resist the urge to shorten them to save a few grams.” |
When to guy out
| Situation | What the sources advise | Source |
|---|---|---|
| Mild breeze, mostly noise | A mild breeze can turn a loose fly into a flapping, rustling nuisance; guying out the middle of a large fly helped | Offroad Passport post |
| Small backpacking tent, normal weather | Low-profile tents “may not need guy-lines except in extreme weather” | Offroad Passport post |
| Small dome tent | Guy out at least the 4 corners | Offroad Passport post |
| Larger dome tent | Also use the guy-out point at the centre of the fly sides, or the fly can get noisy | Offroad Passport post |
| Rain or cool, damp nights | Pull the fly off the tent body so condensation and runoff do not reach it | AMC |
| Heavy wind or snow load | Use the loops midway up the fly, tied to the pole structure; pitch the tent lengthwise to the wind | AMC |
| Non-freestanding tent | “By definition, non-freestanding tents require guylines in order to stand at all.” | Greenbelly |
Guy lines are not a substitute for a good spot. The AMC says “the best protection against heavy winds is good overnight site selection and tent orientation”, and to “Pitch the tent lengthwise, not broadside, to the wind”.
Mistakes and fixes
| Problem | Fix | Source |
|---|---|---|
| Lines left slack | Add tension with the slider or hitch until the fly is taut | Offroad Passport post |
| Fly sags against the tent after a wet or cold night | Re-tension; fabric sags when wet and cold | AMC |
| Someone trips over a line | Add a visible marker; move stakes away from paths | AMC |
| Not enough stakes | Use rocks, branches or other natural features instead | AMC, Greenbelly |
| Ground too loose for stakes | In sand, snow or gravel, Slower Hiking says burying a stick, bag or stake as a “deadman” anchor is “the most weight-efficient and effective staking method” | Slower Hiking |
| Slider keeps slipping | Slower Hiking suggests: “If your lineloc slips, place a slippery half hitch below it.” | Slower Hiking |
| Line stretches and goes slack | Slower Hiking says lines should be non-stretch so load transfers to the stake and soil | Slower Hiking |
| Leaks even with a taut fly | Check the seams; see our guide to sealing tent seams | Our seam-sealing guide |
When to check the manual or move the tent
If your tent’s manual gives a stake angle, line length or loop to use, follow it over any general rule here. If wind keeps shaking a taut, well-guyed tent, the better move is to relocate or turn it. Our guide to types of camping tents has a section on how a tent stands up, and our comparison of a backpacking tent versus a camping tent covers how each pitches.
Related guide: How to Use Tent Stakes
Ready to buy?
Wind and snow load are where guy lines matter most. Our roundup of the best tents for winter and our two-person backpacking tent roundup compare tents you can pitch with these lines.
Frequently Asked Questions
Q. How do you use guy lines on a tent?
Attach a line to each guy-out loop on the rainfly, stake it out away from the tent, then tighten it with a slider or a taut-line hitch until the fabric is taut. Re-check after rain, because wet fabric sags.
Q. When should you use tent guy lines?
Use them in wind, rain and snow, and on larger dome tents to stop panel flapping. A forum post by the Offroad Passport administrator says small, low backpacking tents may not need them except in extreme weather.
Q. How long should tent guy lines be?
Greenbelly puts a typical line at about 3 feet (0.9 m). For the stake spot, one forum post says 2 to 4 feet (0.6 to 1.2 m) from the tent and Tiegear says about 6 to 8 feet (1.8 to 2.4 m). Start with the line the maker supplied and check the tent’s manual.
Q. What is the best knot to attach a guy line to a tent?
Greenbelly recommends a bowline (fixed) or two half hitches. For the end you adjust, NetKnots describes the taut-line hitch, which NetKnots says the Boy Scouts of America recommend for an adjustable sliding knot.
Q. Do you need plastic tensioners?
No. The Offroad Passport post says you can tie a loop around the stake instead, though the sliders make it easy to set length and add tension.
Q. What if the ground is too hard or too soft for stakes?
Greenbelly suggests weighted rocks, logs or trees for ground that is too hard or too soft. Slower Hiking describes burying a stick or spare stake horizontally as a deadman anchor in loose ground.
Sources (6)