The short answer
Match the sealer to the fabric: a silicone sealer such as Gear Aid Seam Grip SIL for silnylon or silpoly, a urethane sealer such as Seam Grip WP or FC for polyurethane-coated fabric. Pitch the tent taut, clean the seams with rubbing alcohol, brush a thin film into the stitching, and let it cure per the label before packing.
Six Moon Designs, a tent maker, explains the problem: “The tiny needle holes from sewing will let water through in sustained rain without sealant.” For its own shelters, Six Moon puts the job at “about an hour of active work”, plus curing time. The right product, the right side of the fabric and the cure time all depend on two makers: the company that made your tent and the company that made your sealer. Where they disagree, this guide shows both.
Start with your tent maker’s instructions
Some tents arrive sealed. MSR says “Some tents, such as select tents from MSR, come seam sealed from the manufacturer.” Others ship with seam tape, a film applied under the seams that, in MSR’s words, “can only be done at the factory because it requires a special machine”. MSR adds that on fabrics “about 68 Denier and above” tape holds well, while on lighter fabrics it “can start to breakdown and flake off” over time.
Even a taped tent may have gaps. Gear Aid’s Seam Grip WP tips say perimeter seams on seam-taped tents “are often not factory sealed and require sealing”; its Seam Grip FC tips page says they “are not factory sealed and require sealing”. Six Moon Designs, which sells mostly silicone-coated shelters, tells owners which sealer each model takes and warns that “Shelters that have been seam sealed by the customer are not eligible for return.” So before you open a tube, read your tent’s manual or product page, and set up a new tent once to make sure you are keeping it.
Tip
If your tent is dirty, wash it first and let it dry fully; our guide to cleaning a tent covers the gentle way to do it.
Which sealer suits your tent’s fabric
The coating decides the sealer. Gear Aid puts it plainly on its Seam Grip SIL page: “silicone will only adhere to silicone”. Its urethane sealers are the mirror image: the Seam Grip WP page says “Seam Grip WP will not work on silicone-treated fabrics or sil-nylon,” and the FC page says the same of FC.
| Your tent’s fabric | Sealer type (Gear Aid example) | Cure time the maker gives | Worth knowing |
|---|---|---|---|
| Silnylon or silpoly (silicone-coated) | Silicone: Seam Grip SIL (formerly SilNet) | 3-6 hours (Gear Aid); 8-12 hours (Six Moon Designs, for its shelters) | Silicone only bonds to silicone |
| Polyurethane (PU) coated nylon or polyester | Urethane: Seam Grip WP | 8-12 hours | Permanent; contains toluene (see step 1) |
| Polyurethane coated nylon or polyester | Water-based urethane: Seam Grip FC (formerly Seam Sure) | 2 hours | Gear Aid says it is less permanent than WP |
| Silicone outside, PU inside | Urethane (Seam Grip WP) on the PU side | 8-12 hours | Gear Aid’s advice for these hybrid fabrics |
That last row matters because, as Gear Aid notes, many makers offer “silicone-treated” fabrics that are not true silnylon. Gear Aid explains that these fabrics “typically have a silicone coating on only one side (outside) and a polyurethane coating on the other (inside)”, and that “If the polyurethane coating is on the inside, use Seam Grip WP seam sealer.” If you can’t tell which coating you have, Gear Aid’s advice is to contact the manufacturer.
Gear Aid is not the only maker. Kenyon describes its Seam Sealer 3 as “an aqueous urethane waterproof coating for seams”, which puts it in the same family as Seam Grip FC. Whatever brand you buy, its own label is the one to follow for fabric, temperature and cure time.
What you need
- The sealer that matches your fabric (table above). Gear Aid says “A 1 oz tube will seal up to 12 feet of seams” of Seam Grip WP; its product pages say “A single 1.5 oz tube can seal up to 24 ft of seams” of SIL, and that FC “comes in a 2 fl oz bottle and seals up to 60 ft of seams or fabric”.
- Isopropyl (rubbing) alcohol and a clean cloth for prep, plus a stiff-bristle brush if old sealer has to come off.
- Gloves and eye protection. Gear Aid’s Seam Grip WP tips say “Wear gloves during application to avoid skin contact.”; for WP, its safety data sheet specifies “Wear chemically resistant protective gloves.” and “Wear eye protection.” For SIL, FC or another brand, use what its label names.
- An applicator. FC has a brush in the cap and the WP repair kit includes one; Six Moon Designs applies SIL from a disposable cup with a half-inch foam brush turned on its tip, or a thin paint brush.
- Somewhere to pitch the tent that meets the label: outdoors or a well-ventilated space (step 1), on a day inside the application temperature printed on your sealer.
- Optional: talcum or talc-free powder for tacky seams, and a garden hose for testing.
How to seal tent seams, step by step
Pitch the tent taut, outdoors or somewhere well ventilated
Seams seal best stretched; Seek Outside says “Remember to stretch seams tight before sealing.” For a rainfly, Gear Aid suggests you “set it up inside-out for easier application and attach the rainfly to the tent so all seams are taut.” If you use Seam Grip WP, read its warnings before you open the tube. It contains toluene, and Gear Aid’s 2017 safety data sheet lists it as “Highly flammable liquid and vapour.” The sheet warns that it “May cause allergy or asthma symptoms or breathing difficulties if inhaled.” and is “Suspected of damaging the unborn child.” Gear Aid’s WP product page carries this warning: “California WARNING: Using this product will expose you to toluene, a chemical known to the State of California to cause birth defects or other reproductive harm”. The sheet’s precautions: “Do not breathe dust/fume/gas/mist/vapours/spray.” “Use only outdoors or in a well-ventilated area.” “Keep away from heat/sparks/open flames/hot surfaces. – No smoking.” “In case of inadequate ventilation wear respiratory protection.” It also warns that “Vapors may be heavier than air and may travel along the ground to a distant ignition source and flash back.” Six Moon Designs, whose shelters take Seam Grip SIL or FC, says: “Pitch your shelter fully tensioned outdoors or in a well-ventilated space (a garage with the door open works great).” The WP lines above come from Gear Aid’s sheet and product page for WP only; for SIL, FC or another brand, the warnings printed on that tube or bottle are the ones to follow.
Check which seams are already sealed or taped
Look at the underside of each seam. On its PU-coated shelters, Six Moon Designs says “Check the underside and skip any seams that already have tape applied.” If tape is lifting, Gear Aid’s advice is: “If a small section of seam tape has peeled, use Seam Grip WP to reattach it. If the tape seems to be failing everywhere, remove and discard it, then clean the seams with isopropyl alcohol and reseal with Seam Grip WP.”
Clean the seams and let them dry
Gear Aid says to “Clean seams on used tents with isopropyl (rubbing) alcohol.” Its FC instructions add: “Clean and dry all surfaces. Remove old seam sealer with stiff bristle brush and isopropyl alcohol.” Put your gloves and eye protection on now; for WP, the safety data sheet calls for “Wear protective gloves/protective clothing/eye protection/face protection.”
Choose the side your tent maker names
Gear Aid’s WP insert says to “Seal seam inside tent”, its FC instructions say the “coated side of fabric (or inside of item)”, and MSR says “Apply the sealant to the underside/inside (or shiny side) of the fabric.” Some makers say the opposite for their own seams: Six Moon Designs writes “The instructions on the bottle may tell you to work from the inside, but our shelters’ seams need to be sealed from the outside,” and Seek Outside recommends “sealing the exterior seams”. Gear Aid’s own general guide even says to “apply a thin film to the outside seams with the included brush”. Gear Aid’s sealant guide gives its reason for the inside: “We recommend making repairs or seam sealing from the inside mainly for aesthetic reasons.” When your tent maker gives a side, use it. If WP goes on the outside, Gear Aid notes it “may slightly yellow when exposed to UV rays.”
Brush a thin film into the stitching
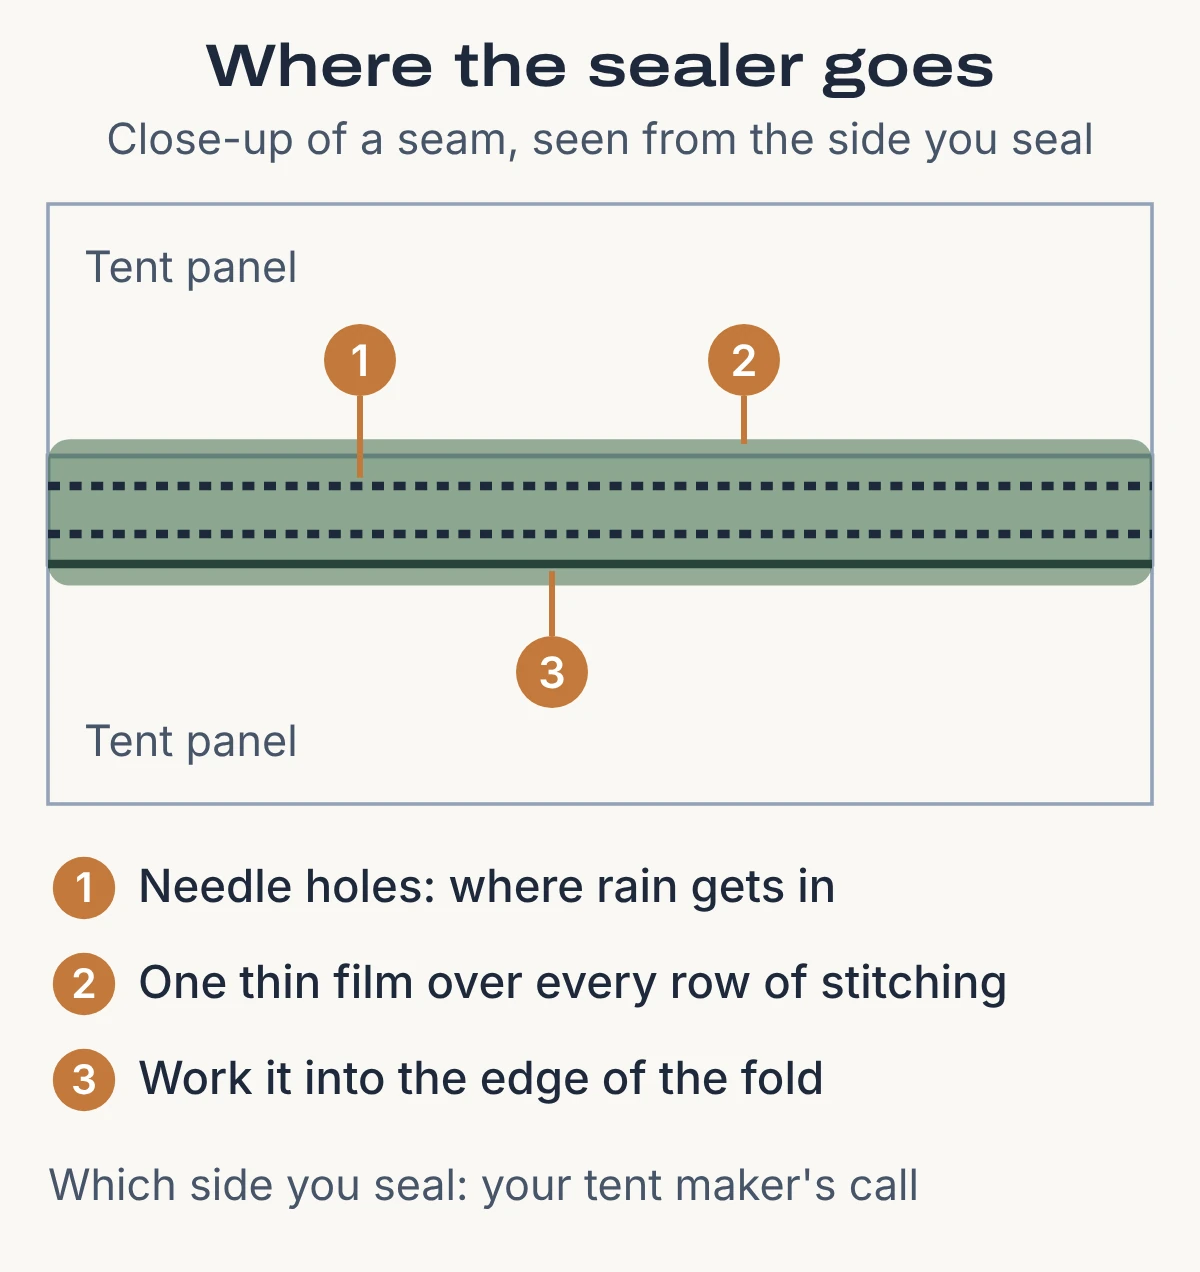
Work one seam at a time. Gear Aid’s WP tips say “Apply a thin layer of Seam Grip WP to the inside of the seam (one coat).” and its insert adds “under fabric folds”. Its FC instructions say “Use brush to work into needle holes, sewn joints, corners and under lap-felled and folded seams,” and to “Clean drips and excess with damp cloth.” With SIL, Six Moon Designs pours a little into a cup and says “Keep the cap on when you aren’t actively pouring, since it thickens quickly once exposed to air.”
Seal the spots that leak most
Gear Aid points to “areas that regularly leak, such as stake-out points at corners.” Seek Outside says “it is more important to do a good job of sealing door tiebacks, hang loops, and guyout points.” If your tent leaked in one place, MSR notes “Often, just sealing up the sections where you’ve noticed drops, is sufficient.”
Leave it pitched to cure for the label’s time
Don’t fold or pack it before then. Seam Grip WP: Gear Aid’s tips say “Allow it to dry overnight, typically taking around 8-12 hours, though it may take longer in low humidity conditions.” (its sealant chooser page says 8-10 hours). Seam Grip FC: “minimum two (2) hours at room temperature or longer if colder”, and overnight for floor seams. Seam Grip SIL: Gear Aid’s SIL product page lists a cure time of 3 to 6 hours in its specifications, while Six Moon Designs tells its owners to “allow the sealant to cure for 8 to 12 hours”; go by the tube you bought. Gear Aid’s FC instructions end with “Test for dryness before use.”
Dust any tacky seams
Gear Aid’s WP insert says “A slight surface tack is normal on freshly cured adhesive” and “Tack can be eliminated with talc-free powder.” Its WP tips page instead suggests “sprinkling it with talcum or baby powder”. Use what your tube’s insert names.
Test before your next trip
Six Moon Designs suggests you “spray the shelter with a garden hose on a fine mist setting” from several angles, then check inside. “If you find a spot, let it dry, apply another coat to that area, and test again.”
Mistakes and troubleshooting
Using the wrong chemistry. Gear Aid says its WP and FC urethane sealers will not work on silnylon, and Six Moon Designs notes that its few polyurethane-coated models need “a different product” from the silicone sealer.
Sealing over failing tape. MSR warns that with old tape “oftentimes the residual tape interferes and causes a headache.” Strip tape that is failing everywhere before you seal, as in step 2.
Working in the cold or packing too soon. Each Gear Aid sealer lists an application temperature range, and Gear Aid calls WP “a moisture-cured adhesive, meaning the more moisture present, the quicker it dries.” Six Moon Designs notes “Warm, dry weather speeds curing; cold and humid conditions slow it down.”
Storing the tent damp. MSR calls this “the worst culprit” for seam tape breaking down. Dry the tent before it goes in its bag.
Sealing seams that are not the problem. Gear Aid lists four ways a tent lets in water, and only one is a seam:
| Where the water shows | Likely cause (Gear Aid) | What fixes it |
|---|---|---|
| Along the stitching | Water coming through the seams | Seam sealer, as above |
| Through the rainfly fabric | The fly needs a water-repellent coating | A water-repellent treatment |
| Through the floor | The PU coating is peeling away | Gear Aid’s Seam Grip TF re-coats the floor |
| Inside, after you sleep | Condensation | Open the zipper for more airflow |
When to stop and ask the maker
Ask your tent’s maker before you seal if the fabric is unknown, if the tent is new and you might return it, or if the manual names a sealer. Gear Aid’s own advice for unclear coatings is to contact the manufacturer.
Ready to buy?
If your tent is past repairing, our roundups of the tents for winter camping and two-person backpacking tents compare current models, and for car camping see our waterproof family tent picks.
Frequently Asked Questions
Q. Do you seal tent seams on the inside or the outside?
Usually the inside or coated side, per Gear Aid and MSR. Some makers, such as Six Moon Designs and Seek Outside, want the outside for their own seam designs, so your tent’s manual decides.
Q. Do new tents need seam sealing?
Some do. MSR seals some of its tents at the factory, others ship with taped seams, and some ultralight silnylon shelters arrive unsealed for the owner to finish.
Q. How long should seam sealer dry before packing the tent?
As long as the label says, with the tent pitched. Gear Aid gives 2 hours for FC and 8 to 12 hours for WP. For SIL, Gear Aid gives 3 to 6 hours and Six Moon Designs says 8 to 12.
Q. Can I make my own tent seam sealer?
Six Moon Designs describes a do-it-yourself silicone sealer for its silicone-coated shelters in its seam-sealing guide; if you try it, follow that guide and the warnings on each product it uses. It is no substitute on PU-coated fabric.
Q. Can I speed up Seam Grip WP?
Gear Aid sells Aquaseal FD Cure Accelerator, which its WP tips page says gives “a quicker 2-hour dry time” when mixed with Seam Grip WP. Follow the accelerator’s own label for the mix and its warnings.
Q. Does waterproofing spray seal tent seams?
Gear Aid treats them as separate jobs: seams need a seam sealer, while a rainfly that wets through needs a water-repellent coating.
Sources (13)
- Gear Aid, How to Waterproof and Seam Seal a Tent
- Gear Aid, Tips for Using Seam Grip WP
- Gear Aid, Seam Grip WP Sealant product page
- Gear Aid, Seam Grip WP instructions insert (PDF)
- Gear Aid, SeamGrip (Seam Grip WP) Safety Data Sheet, rev. 01/03/2017 (PDF, hosted by retailer NRS; Gear Aid’s site lists none)
- Gear Aid, Tips for Using Seam Grip FC
- Gear Aid, Seam Grip FC Fast Cure Seam Sealant product page
- Gear Aid, Seam Grip SIL Silicone Sealant product page
- Gear Aid, Which Sealant Should I Use?
- Kenyon, Seam Sealer 3
- MSR (Cascade Designs), Tents 101: Seam Taping vs. Seam Sealing
- Six Moon Designs, Guide to Seam Sealing Ultralight Tents and Tarps
- Seek Outside, How To Seam Seal A Tent