The short answer
A 2D sonar screen is a scrolling timeline: the newest echoes appear on the right, the top is the surface and the bottom line is the floor. Fish usually show as arches or marks, bait as clouds, and a thicker, brighter bottom line often means harder ground. Set range and sensitivity first, then slow down.
A fish finder sends sound down from a transducer and draws the echoes that come back. Once you know what the screen is drawing, the colored marks stop looking like noise: a depth scale, a history that scrolls past, and a handful of shapes that repeat.
This guide covers the traditional 2D view, the one Garmin, Humminbird and Lowrance units all share. Menu names differ by brand and model, so each step says whose wording it uses, and your own manual has the last word.
What you need
- A working fish finder with its transducer mounted on your boat or kayak. Humminbird’s help center says the unit “must have a transducer that is facing straight downward” to show fish.
- The owner’s manual for your exact model. Garmin notes that “Available settings vary by device and transducer configuration.”
- Slow, open water to idle in, ideally over a spot you already know. Outdoor Life suggests going “someplace where you know what’s underneath the surface” so you can match what you see to what is there.
- A few minutes per setting. Garmin advises: “Make one adjustment at a time and observe how the sonar image changes before making additional adjustments.”
Note
Mounting a transducer and wiring a unit is a separate job that this guide does not cover. Follow the installation guide for your unit and transducer; Humminbird’s manual sends owners to the transducer installation guide when the transducer position needs adjusting. Fishing licences are separate too. The U.S. Fish & Wildlife Service says: “First, you’ll need a fishing license.” It adds: “Every state has slightly different rules, so look up your state for state-specific requirements.”
Safety
A fish finder is not a navigation aid. Humminbird’s manual warns: “This device should not be used as a navigational aid to prevent collision, grounding, boat damage, or personal injury. When the boat is moving, water depth may change too quickly to allow time for you to react. Always operate the boat at very slow speeds if you suspect shallow water or submerged objects.”
How the screen is drawn
Garmin explains that “A traditional transducer sends sound waves downward in a cone-shaped beam.” The sound reflects off fish, vegetation and the bottom, and the unit draws the returns as an image. Outdoor Life adds that as the water gets deeper, the cone’s signal “extends out further from its core,” so a deeper beam covers a wider patch of bottom.
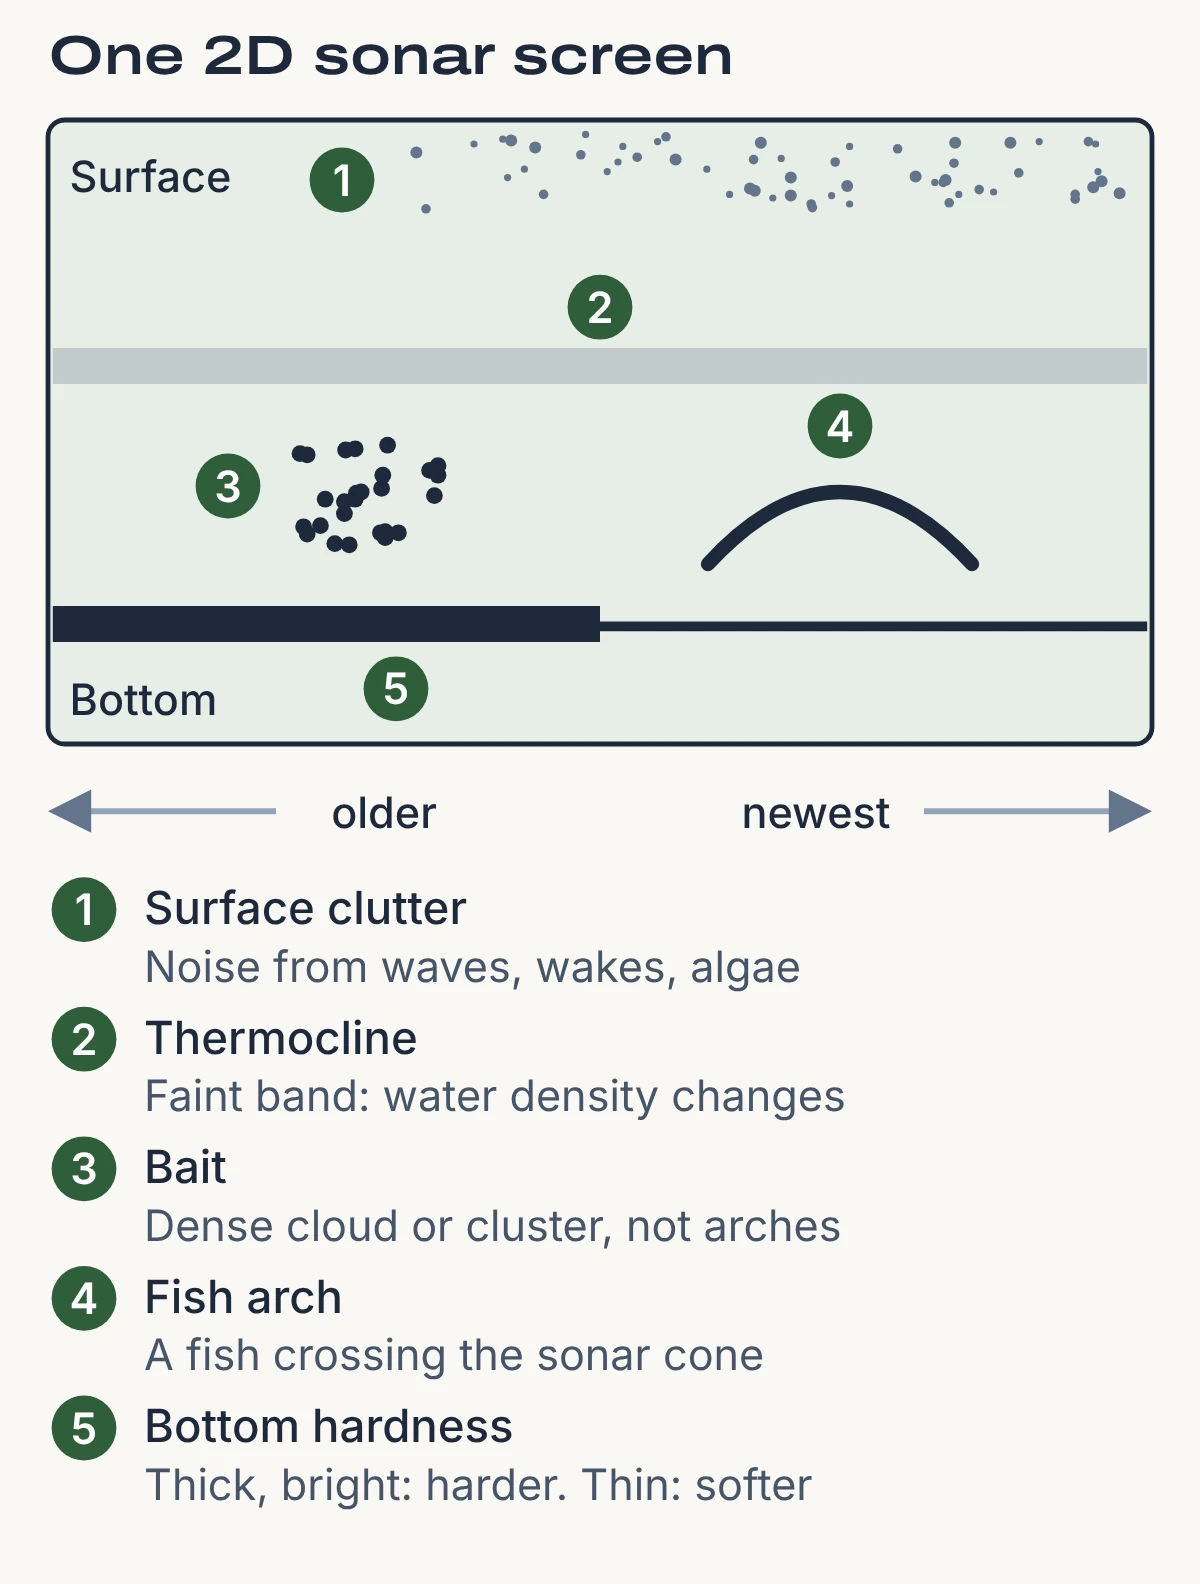
The picture is a history, not a live view. Simrad says the image “scrolls right to left, displaying the latest returns on the right side of the screen and progressively older data toward the left.” The diagram shows one frame: depth runs down the screen, time runs across it.
How to read your sonar screen, step by step
Start at idle and let the screen scroll
Put the unit in its basic 2D sonar view and motor slowly over open water. Top of the screen is the surface, the line near the bottom is the floor, and the right edge is what is under the transducer now. Deeper warns that the display keeps scrolling when you stop: “If your fish finder is stationary, the bottom will appear flat but it might not be.”
Read the depth number, and know what it measures
Lowrance’s manual says “All transducers measure water depth from the transducer to the bottom,” so water depth readings “do not account for the distance from the transducer to the lowest point of the boat in the water or from the transducer to the water surface.” Use it as information, not as a guarantee of safe water: Humminbird warns that “When the boat is moving, water depth may change too quickly to allow time for you to react,” and says to operate “at very slow speeds if you suspect shallow water or submerged objects.”
Set the depth range
Lowrance’s manual says “Auto is the preferred setting for fish finding”: the screen then shows everything from surface to bottom. Simrad says manual range is useful “when targeting fish holding at a consistent depth.” Lowrance cautions that “Setting a deep range in shallow water may cause the system to lose track of the depth,” so keep manual ranges realistic for where you are.
Tune sensitivity (gain) and surface clutter
Garmin calls the setting gain and says “Higher gain settings typically work best in clear water,” while “Lower gain settings can help reduce clutter and improve image clarity” in muddy or shallow water. Simrad’s rule of thumb is to “increase gain until you begin to see a small amount of background noise, then reduce it slightly.” For clutter at the top, Humminbird says to use its Surface Clutter setting “to reduce the noise that may appear at the top of the view caused by algae and aeration,” and Lowrance’s manual says “Wave action, boat wakes and temperature inversions can cause onscreen clutter near the surface.” Filter gently: Humminbird’s troubleshooting page lists blocking too much surface clutter as one reason arches go missing.
Pick a frequency that fits the depth
Simrad suggests a high frequency such as 200 kHz for shallower water, “typically under 100 ft,” and a low frequency such as 50 kHz for “deeper water beyond 100 ft.” Garmin adds that “Lower frequencies achieve greater depth at the expense of image detail.” Garmin rates its High CHIRP band as “Best for fishing in water less than 800 ft (244 m) deep,” so the depth at which to switch frequency depends on your transducer and its maker; check your manual. Treat these as starting points; your transducer may offer fewer choices.
Turn fish symbols off while you learn
Fish symbols are the unit’s interpretation of the returns. Lowrance’s manual notes “Not all fish symbols are actual fish.” Garmin says that with symbols off, “the device displays the actual sonar return rather than interpreting targets as fish icons,” and Humminbird says that with Fish ID+ off, “the control head shows only the raw sonar returns on the display.”
Slow down and look for arches
Humminbird explains that for an arch “the fish must enter the beam on one side and exit through the opposite side and basically bisect the cone.” The arch forms because the distance to the fish is greater at the edges of the beam than at its center. Simrad suggests holding “a steady speed around 1-3 mph” for recognizable arches, and Humminbird says “The true depth of the fish is the top of the arch when the transducer is directly over the fish.” A fish that clips the edge of the cone may show as less: Garmin says it “may appear as only a partial arch or a solid mark on the screen.”
Judge size with caution
Simrad says “Thicker arches typically represent larger or denser fish,” and Humminbird says that in its Clear Mode “a large arch on the display means a large fish has been detected.” Humminbird’s help center adds that the same fish draws a larger arch in deeper water. Garmin is more careful: “the size of a fish arch does not always indicate the actual size of the fish,” because boat speed and fish movement change the shape. Use size as a clue, not a measurement.
Look for bait, then for what is around it
Simrad says “Instead of arches, bait balls show up as dense clouds or clusters on your display,” and that predator fish “often appear as arches below or around the bait.” Simrad adds that a tight cluster suggests concentrated bait and a looser cloud suggests it is spreading out.
Read the bottom
Humminbird says “Strong returns often result from rocky or hard bottoms (compacted sediment, rocks, fallen trees), while weaker returns often result from soft bottoms (sand, mud), vegetation, and small fish.” Garmin’s Edge (Whiteline) setting “Highlights the strongest bottom return to help identify bottom hardness.” Then: “Hard bottoms display a thicker highlighted layer. Soft bottoms display a thinner highlighted layer.” Simrad adds that ledges, wrecks and humps “will break up that bottom line.” Colors depend on your palette, so learn what yours means with a known bottom first.
Zoom in when fish sit near the bottom
Simrad notes that fish “holding tight to the bottom can be difficult to distinguish from structure.” Humminbird’s Sonar Zoom View gives “a magnified view of the bottom and structure,” and Simrad says bottom lock “keeps your view centered on the bottom, helping separate fish from structure.”
What common marks usually mean
| What you see | What it often is | Source |
|---|---|---|
| Full arch | A fish passing through the middle of the cone | Humminbird, Garmin |
| Partial arch, short line or solid mark | A fish crossing only part of the cone | Garmin, Simrad |
| Dense cloud or cluster | Baitfish | Simrad |
| Thick, bright bottom line | Harder bottom such as rock or compacted sediment | Garmin, Humminbird, Simrad |
| Thin bottom line | Softer bottom such as sand or mud | Garmin, Humminbird, Simrad |
| Faint horizontal band in mid-water | A thermocline, where water density changes | Humminbird |
| Speckles near the top | Surface clutter from waves, wakes, algae or air | Lowrance, Humminbird |
Humminbird adds a reminder that applies to every row: “It must be remembered that sonar shows a distance measurement only.” Simrad lists what else can fool you: “Debris, thermoclines, and interference can all create returns.”
For the thermocline, Humminbird says to “Increase the sensitivity to view a weaker sonar reflection from the thermocline,” and that the temperature difference “has to be great enough and changed quickly enough vertically” to show up. Garmin says its low CHIRP setting “Helps identify the thermocline.”
Garmin, Humminbird and Lowrance: same screen, different names
The shapes above look alike across brands. The setting names do not. Garmin’s names come from its sonar settings support page, Humminbird’s from the HELIX manual and Lowrance’s from the ELITE FS manual; other models and newer software may use different names.
| Setting | Garmin | Humminbird | Lowrance |
|---|---|---|---|
| Sensitivity | Gain | Sensitivity | Sensitivity |
| Fish symbols | Fish Symbols | Fish ID+ | Fish ID |
| Surface clutter | Surface Noise | Surface Clutter | Surface clarity |
| Fish near the bottom | Zoom, Bottom Lock | Sonar Zoom View | Zoom, Bottom lock |
Garmin’s support page adds: “Not all sonar options are available on all Garmin chartplotters, fishfinders, sonar modules, and transducers.”
What CHIRP means on a fish finder
CHIRP is a way of sending the sound pulse. Garmin spells it out as “Compressed High-Intensity Radiated Pulse” and says CHIRP devices “transmit multiple frequencies per ping, sending a continuous sweep from low to high,” where traditional sonar pings one frequency at a time. Garmin says this gives “a clearer image with higher resolution and better separation of targets.” Wired2Fish, in a piece drawing on a Lowrance product expert, describes CHIRP as “not so much a new type of sonar, but rather a better way to process and display traditional 2D sonar.”
For reading the screen, that means the same rules apply: arches, clouds and bottom lines look the same in kind, usually with cleaner detail. Many CHIRP units let you pick low, medium or high bands, and Garmin says each provides “a different balance of depth and detail.”
If you move beyond 2D
Down imaging and side imaging use different pictures. Outdoor Life gives these starting points:
- Down imaging: baitfish “look like a wispy cloud,” and rocks and trees “will be in a lighter shade because they generate a stronger return.”
- Side imaging: sonar shadows help gauge height: “If the shadow is close to the mark, it’s tight to the bottom, and if the shadow is far from the mark, it’s higher off the bottom.”
Common mistakes and quick fixes
- Treating every symbol as a fish. Simrad: “Not every mark is a fish.” Look for consistent shapes rather than single specks, and compare with the raw returns.
- Reading the screen as live. Simrad says “Your sonar is a timeline, not just a live view.”
- Expecting clean arches at speed. Humminbird says the same fish produces “a much shorter arch” when the boat is moving fast or the display updates slowly.
- Leaving everything on automatic. Simrad: “Auto settings are a starting point, not a final solution.”
- No arches at all. Humminbird suggests raising sensitivity, turning Fish ID off if you want arches, easing the surface clutter filter and turning off other depth sounders on the boat. It also says that if the boat is moving up and down in waves, “any sonar returns from fish may be scattered vertically and not be recognizable as a fish at all.”
- A screen that still looks wrong. Garmin advises: “If multiple changes do not produce the desired results, restore the sonar settings to their default values and begin again.” Humminbird warns that “Disassembly and repair of this electronic unit should only be performed by authorized service personnel,” so contact the maker’s support rather than opening the unit.
Putting a reading to use
Once the screen gives you a depth, you can act on it. Our guide to putting a bobber on a fishing line shows where the weight goes and how to set depth, and our beginner bass fishing guide covers matching depth and speed to the season. More step-by-step help is in our skills and how-to guides.
Frequently Asked Questions
Q. How does a fish finder work?
A transducer sends sound waves down in a cone-shaped beam, and the unit draws the echoes that reflect off fish, plants and the bottom (Garmin). The screen scrolls so the newest echoes are on the right (Simrad).
Q. What do fish look like on a fish finder?
Usually as arches or short marks between the surface and the bottom, depending on how much of the cone they cross. Many units can also replace them with fish symbols, which Lowrance says are not always real fish.
Q. What is CHIRP on a fish finder?
CHIRP stands for Compressed High-Intensity Radiated Pulse. Instead of one frequency per ping it sweeps a range of frequencies, which Garmin says produces a clearer image with better target separation.
Q. How do I read a Lowrance, Garmin or Humminbird fish finder?
The same way: top is the surface, right is newest, arches usually mean fish, and the bottom line hints at hardness. Use the table above for each brand’s setting names and your manual for the menus.
Q. How do I install a fish finder on a boat?
Follow the installation guide supplied with your unit and transducer; wiring and mounting are outside this guide. Humminbird’s manual sends owners to the transducer installation guide when the transducer position needs adjusting.
Q. Why does my bottom look flat when the boat stops?
The screen keeps scrolling whether or not you move. Deeper says a stationary fish finder shows a flat-looking bottom that “might not be” flat.
Sources (12)
- Garmin Support, Understanding Garmin Sonar Settings
- Garmin Support, Identifying and Utilizing Garmin Fish Symbols
- Garmin Marine, CHIRP Technology
- Humminbird Help Center, Not Seeing Fish Arches
- Humminbird Help Center, Seeing Thermocline
- Humminbird, HELIX Series Operations Manual
- Lowrance, ELITE FS User Manual
- Simrad, Traditional Sonar: How to Read It Like a Pro
- Deeper, How to Read Deeper PRO/PRO+ 2 Fish Finders
- Outdoor Life, How to Read a Fish Finder
- Wired2Fish, All You Wanted to Know about CHIRP Sonar
- U.S. Fish & Wildlife Service, Purchase a Fishing License