The short answer
A fly rod rig links reel, backing, fly line, leader, tippet and fly with five connections. Tie the fly to the tippet with an improved clinch knot: five turns, tag end through the small opening by the hook eye, then through the big loop, wet it and pull snug. A non-slip loop lets the fly swing freely.
Nothing is tied to the rod itself. The line runs through the guides, and you join the pieces to each other from the reel out to the hook. Orvis, a fly-fishing maker and retailer, says in a Learning Center video transcript that “for most fishing you need only two – one to tie the fly to the leader and another to tie the two pieces of leader material together.” This guide shows where every knot sits, then works through tying the fly on, adding a second fly, and fishing a fly from a spinning rod. For the rest of your tackle, see our fishing gear hub.
Related guide: How to Tie a Fishing Rod Knot: Reel Spool to Hook
Scientific Anglers (SA), a fly-line maker, suggests practicing before you stand in a stream, on “A leader, a piece of rope, or best of all, some old fly line.”
What you need
- A rod with line and leader already on it. Spooling backing and joining line to leader are named in the table below but not taught here.
- A spool of tippet. Matching its size to the fly is its own question; this guide only ties it on.
- Nail clippers. SA says “A pair of nail clippers is the only tool” you need to assemble the system.
- Eye protection. See the safety note below.
- A fishing license, before you go to the water. Most states require a fishing license for anglers over a set age, and the age varies by state; check your state’s wildlife agency before you go. Washington’s Department of Fish and Wildlife says “All fishers age 16 and older need a fishing license,” and Maine’s says “A valid Maine fishing license is required for anyone 16 years of age or older, to fish in inland waters.”
Safety
A fly is a hook, and you are pulling a knot tight right beside your face. Orvis News lists “Eye protection” as one of the jobs of fly-fishing sunglasses, so wear them. The National Park Service says: “If you are hooked, learn first aid for removing hooks from the skin and treating the wound. If the hook has deeply penetrated the skin, muscles, tendons, or bone, if it is on the face or near/in the eyes, or if you are bleeding excessively, seek medical treatment immediately.” For an object in the eye, MedlinePlus (National Library of Medicine) says: “Leave the object in place. Do not try to remove the object. Do not touch it or apply any pressure to it.” and “Get medical help right away. Do not delay.”
How the knots fit together from reel to fly
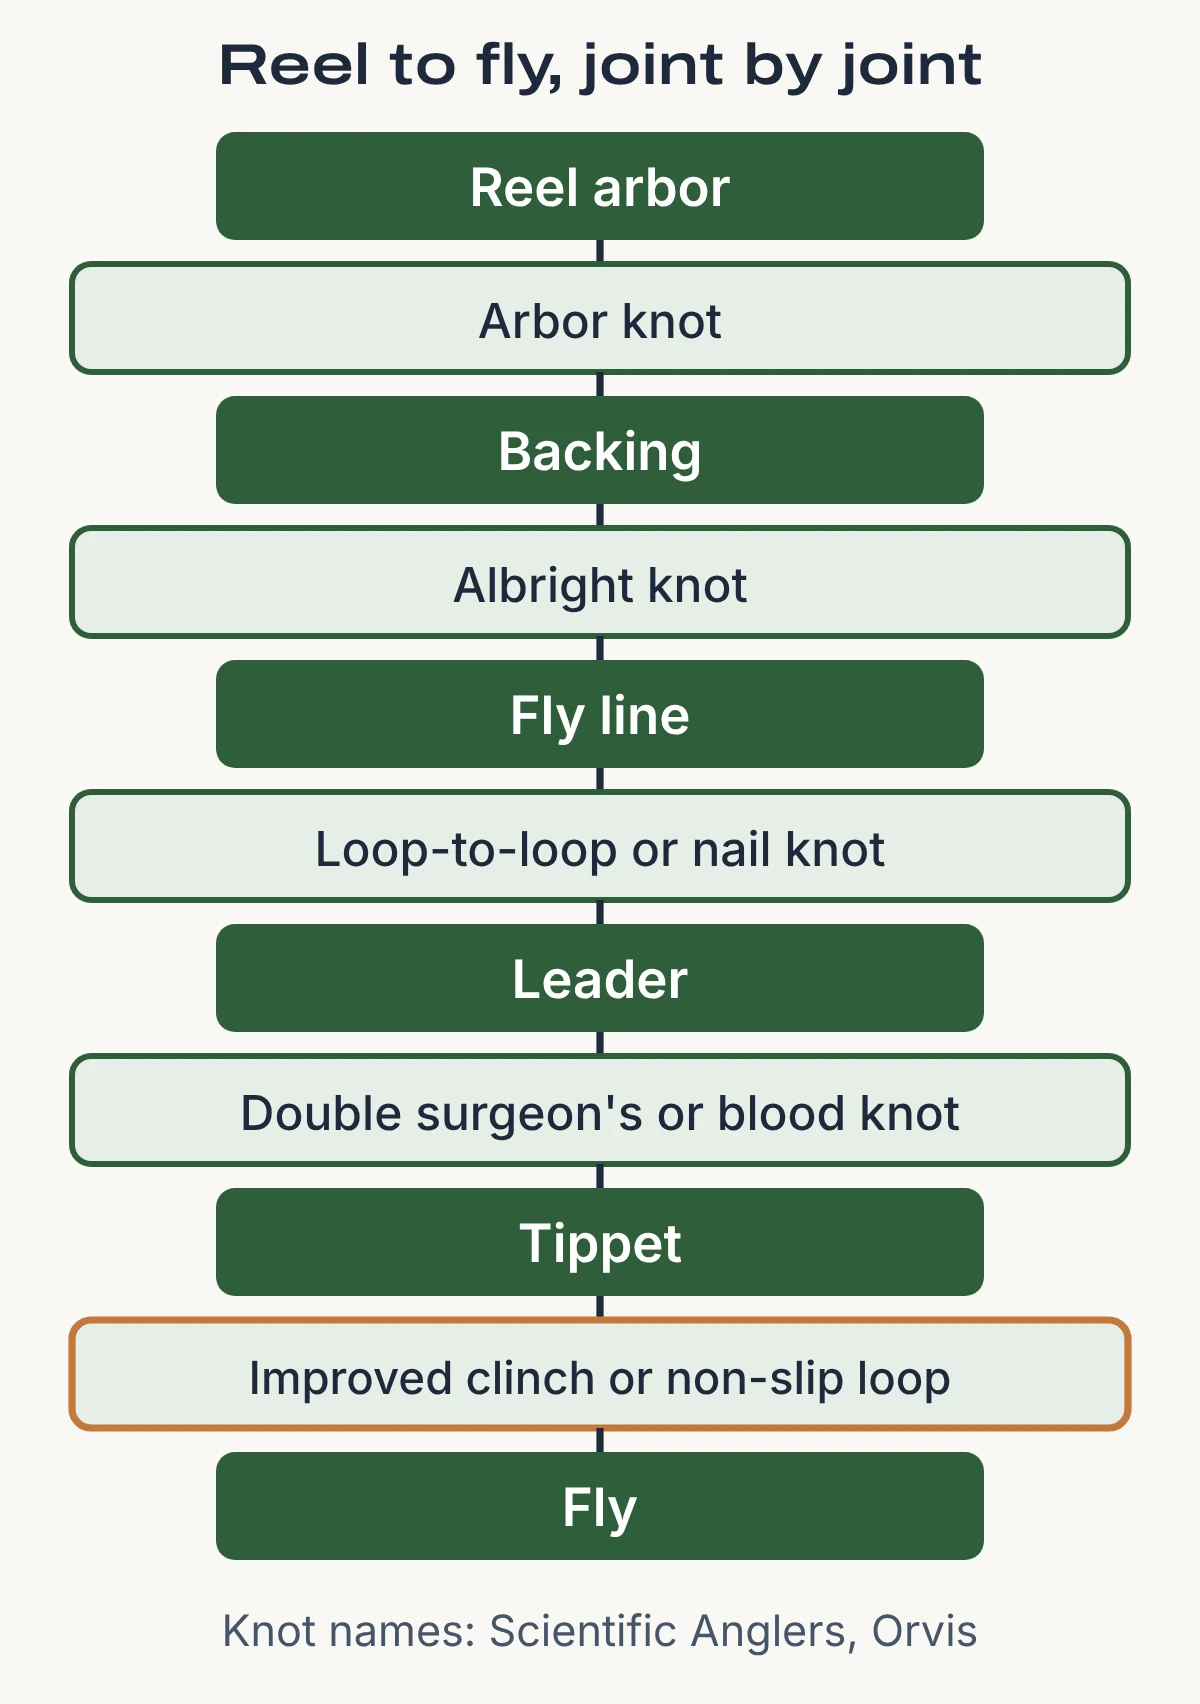
SA calls the pieces a balanced system and ends its knot guide by saying you have joined “all the pieces of your tackle system” with backing, line, leader, tippet and fly. Each joint has its own knot or connection:
| Joint | Knot | Source | In this guide? |
|---|---|---|---|
| Reel to backing | Arbor knot | SA: it “uses the Arbor Knot.” | Named only |
| Backing to fly line | Albright knot | SA: “Use the Albright Knot for tying backing to fly line.” | Named only |
| Fly line to leader | Loop-to-loop or nail knot | Orvis (loop-to-loop), SA (nail knot) | Named only |
| Leader to tippet | Double surgeon’s or blood knot | SA (double surgeon’s), Orvis (blood knot) | Named only |
| Tippet to fly | Improved clinch or non-slip loop | SA, Orvis | Steps below |
SA calls the improved clinch “The most important of these” knots because it is the one you use to tie on your flies and “you will use it the most.” That is why this guide starts there.
Which knot ties the fly on?
Three knots come up in the sources, and they do slightly different jobs.
| Knot | Turns | What the source says | Source |
|---|---|---|---|
| Clinch | Not counted in the written steps | “The easiest knot to use is the clinch knot” for tying a fly to a leader, for trout, bass and panfish | Orvis Learning Center |
| Improved clinch | 5 | SA recommends it for tying a fly to your tippet | Scientific Anglers |
| Non-slip loop | 5 or 6 | A loop “can give the fly or lure more natural action” | Orvis (turns), Net Knots (action) |
Net Knots is a knot-tying reference site.
How to tie a fly on with an improved clinch knot
These steps follow SA’s written instructions part by part. Hold the fly by the bend or the eye, never by the point.
Put on your eye protection, then pass the tippet through the hook eye
SA says to “Insert 5” to 6” of tippet through the hook eye” (about 13 to 15 cm).
Make five turns around the standing part, winding away from the hook
SA: “Make five turns with the tag end around the standing part of the tippet, winding away from the hook.” Animated Knots, a knot reference site, says “five or more turns are recommended, with heavier lines this may be reduced to four.”
Pass the tag end through the opening next to the eye
SA: “Push the tag end through the opening between the hook eye and the first wrap.” This leaves an open loop over the wraps.
Pass the tag end through that open loop
SA: “Push the tag end through this open loop and pull slightly until the knot begins to close.”
Moisten the knot and snug it up
SA says to “Moisten the knot area” and then “Alternately pull on the standing portion of the tippet and the hook until the knot snugs up against the hook eye.” Keep the point away from your fingers while you pull.
Trim the tag end and test the knot
SA says to trim the tag and to “test every knot by pulling on it,” and that “moisten all knots before drawing them tight” and tightening slowly lower the chance of failure.
Orvis’s written plain clinch differs in one detail: it says “Let go of the tag end when tightening this knot.” Follow the instructions for the knot you are tying, not a mix of the two.
How to tie a fly on with a non-slip loop
A loop leaves the fly free to move instead of pinching it against the eye. Net Knots says the loop connection “can give the fly or lure more natural action,” and that the knot is “popularized by fishing legend Lefty Kreh.” Orvis’s page for the knot (it calls it the non-slip mono loop) has the first steps and the turn counts; Net Knots and Fly Life Magazine, a fishing publication, give the finish.
Tie a loose overhand knot in the tippet, well back from the end
Orvis says to “allow about 10 inches of tag end” and “Don’t tighten the loop.”
Pass the tag end through the hook eye
Eye protection stays on.
Bring the tag end back through the overhand knot
Orvis says to make sure “that it enters the loop formed by the overhand knot on the same side that it exited when you tied the overhand.” Slide the overhand knot up or down the standing part to set the loop size: “The distance between the fly and the overhand knot determines the size of your loop.”
Wrap the tag end around the standing part
Orvis: “Make 6 turns for material less than 8-lb test, 5 turns for material up to 40 lb.” Net Knots counts “4 or 5 times,” so counts differ by source; pick one source’s count and stick to it.
Pass the tag end back through the overhand knot a second time
Orvis’s written steps stop after the wraps. Net Knots finishes it: “Bring tag end back through overhand knot, entering from same side it exited from before.” Fly Life says to pass the line back through “the same way it came out in the last step.”
Moisten, cinch and seat
Net Knots says to moisten the knot and “pull slowly on the tag end to cinch the wraps loosely together,” then pull “the loop and the standing line in opposite directions to seat the knot,” and trim the tag end. Do it with the point turned away from you.
How to add a dropper (a second fly)
A dropper is a second fly on its own piece of tippet. Orvis News says “Tying the dropper to the hook bend of the top fly is the most common method for creating a tandem rig.” It asked a panel of experts from guide services and outfitters where they attach the second fly, and the answers differ.
Tie the first fly to the end of your tippet
with the improved clinch above.
Cut a length of tippet for the second fly, one size smaller
Rob Woodruff of Woodruff Fly Fishing (Norfork, Arkansas), one of the panel, writes: “I always attach the second fly with a tippet that is one size smaller than what is tied to the upper fly.” He says the lower fly is the likeliest to snag, so a lighter tippet loses just one fly.
Tie it to the bend of the first hook with an improved clinch, holding the fly hook up
Orvis News says to try “holding the top fly upside down (hook up)” so the knot does not slide off while you thread the tag end. A hook pointing up needs your fingers clear of it. If the top fly is on a manufactured barbless hook, Brown Hobson of Brown Trout Fly Fishing (Asheville, North Carolina) says “The clinch knot just slides off and the dropper is gone”; tie to the eye of the top fly instead (Weisse’s method, below) or use a hook with a barb or a mashed barb.
Set the dropper length
Orvis News: “The length of the dropper line should be determined by the water depth and speed, but 18- to 24 inches is a good place to start.”
Tie the second fly to the free end
with the improved clinch or the non-slip loop.
| Where the dropper ties on | Who says what |
|---|---|
| Bend of the top fly | Orvis News: the most common method, an in-line system “less likely to tangle than a rig involving the tag end of a knot in the leader” |
| Eye of the top fly | Cliff Weisse, a guide at Three Rivers Ranch in Ashton, Idaho: “you avoid snagging and de-hooking problems.” Doc Thompson of High Country Anglers (Ute Park, New Mexico): it “does sometimes create more casting tangles” |
| Tag end of a leader knot | Named by guides on the Orvis panel; teaching the leader knots is outside this guide |
Weisse writes in Orvis News: “By tying the dropper tippet through the eye of the hook in front, you avoid snagging and de-hooking problems.” Two cautions from the same sources. Brown Hobson of Brown Trout Fly Fishing (Asheville, North Carolina) says that on a manufactured barbless hook “The clinch knot just slides off and the dropper is gone,” so he ties to the bend most often when the hook has a barb or a mashed barb, and uses a tag end on barbless flies. And if you tie a dropper to the eye, Weisse says not to test it by yanking the tippet with the fly in your hand: “you will bury the hook in your hand all the way to the bend.” Some waters also have their own tackle rules, so read your state’s regulations before you fish two flies.
Tying a fly on a spinning rod
A fly weighs almost nothing, and a spinning rod casts weight. John Baltes, Chief Editor of USAngler (a fishing website), writes that “you need weight to cast a fly with spinning tackle, and both casting bubbles and weighted slip floats will get the job done.” Martin Joergensen of Global FlyFisher, a fly-fishing website, describes Danish anglers who “use a spinning rod and a bubble float,” and says “Many fly fishers also prefer the method if the wind makes casting a fly hard or even impossible.” His 1999 article (the site marks it “an old article”) describes sea-trout fishing in Denmark.
Pick a bubble and rig it the way its design needs
USAngler says “Many casting bubbles offer eyes at both ends, but some work like slip floats and need a big stopper. Both designs work well, with the sliding option being easier to cast.”
Fixed bubble (eyes at both ends)
tie your main line to one eye and a lighter leader to the other. Baltes runs a standard-weight mono main line to one side and a “lighter leader” to the fly. Choosing the main line is covered in our roundup of trout fishing lines.
Sliding bubble
thread the main line through the bubble’s tube, which Joergensen wants to be “the type where the line runs through a tube in the center,” then tie the main line to a small swivel and the leader to the swivel’s other eye. The swivel stops the bubble above the leader; pick one too big to pull into the tube. USAngler says bubbles of this kind “need a big stopper,” and Joergensen says the tube lets the float “slide up the line when the fish takes the fly.”
Cut about 3 feet of leader
Baltes: “I like about 3 feet, as more makes casting tough and less puts the fly too close to my bubble.” That is his preference, not a rule.
Tie the fly on at the end of the leader
Neither article names a knot for a fly at the end of the leader; the improved clinch and non-slip loop above are the fly knots the fly-fishing sources teach.
If it is a water-fill bubble, fill it, then cast with eye protection on and the area behind you clear
Baltes: “you simply fill the bubble with enough water to allow casting.” A pre-weighted bubble needs no water. The hook is still flying past your head.
If you do not own a spinning outfit yet, see our roundup of spinning rods under $100. A bubble is a float, and our guide to putting a bobber on a fishing line covers fixed and slip floats on a spinning rig.
Warning
A bubble rig is not allowed on every fly-fishing water. Pennsylvania’s code for waters “designated and posted as catch and release fly-fishing only” says “Spinning, spincast and casting rods and reels are prohibited.” Other states word their rules differently, so check the regulations for your water.
Mistakes and fixes
| What goes wrong | What to do |
|---|---|
| The knot is dry when you tighten it | SA: “moisten all knots before drawing them tight” |
| You never pull-test the knot | SA: “test every knot by pulling on it” before you cast |
| You count turns from a mix of sources | Pick one source’s count for each knot; Orvis and Net Knots differ on the non-slip loop |
| A bend-of-hook dropper keeps sliding off | Hobson: it happens on manufactured barbless hooks; he uses a tag end there; tying to the eye (Weisse’s method) also avoids it |
| The dropper snags and pulls the first hook out | Weisse: tie the dropper through the eye of the front fly |
| Your eyes are unprotected | Wear sunglasses or safety glasses before you tie, pull or cast |
Frequently Asked Questions
Q. How do you tie a fly to a tippet?
Use the improved clinch above: five turns, through the opening by the eye, through the big loop, wet and snug. SA recommends it for tying a fly to the tippet.
Q. How many turns does an improved clinch knot need?
SA says five. Animated Knots says “five or more turns are recommended,” with four on heavier lines.
Q. How do you tie a leader on a fly rod?
The leader joins the fly line with a loop-to-loop connection or a nail knot, and the tippet joins the leader with a double surgeon’s or blood knot. This guide names them in the table; it does not teach them.
Q. How do you tie fly fishing line to the reel?
Backing ties to the reel arbor with an arbor knot, and the fly line joins the backing with an Albright knot, per SA. Both are named only here.
Q. How do you tie a fly on a spinning rod?
Add weight with a casting bubble, then tie the fly to a leader of about 3 feet, as Baltes does. Check that your water’s rules allow it.
Q. What is the best knot to tie a fly on?
Sources do not name one winner. SA recommends the improved clinch, Orvis calls the clinch “the easiest knot to use” for trout, bass and panfish, and a loop gives the fly more movement according to Net Knots.
Sources (20)
- Scientific Anglers, Fly Fishing Knots Every Fly Fisherman Should Know
- Orvis Learning Center, The Clinch Knot For Tying On A Fly
- Orvis Learning Center, Clinch Knot Animation
- Orvis Learning Center, Non-Slip Mono Loop
- Net Knots, Non-Slip Loop Knot
- Animated Knots, Improved Clinch Knot
- Fly Life Magazine, Tips & Tactics: Tying the non-slip loop knot
- Orvis News, Ask the Experts: How Do You Attach the Second Fly in a Tandem Rig?
- Orvis News, Pro Tips: 5 Top Tandem-Rig Combos for Trout
- Orvis News, Pro Tip: A Better Way to Rig Droppers
- USAngler, Fly Fishing With A Spinning Rod
- Global FlyFisher, Bubble float
- Pennsylvania Code, 58 Pa. Code 65.14 Catch and release fly-fishing only
- Orvis Learning Center, Loop-Loop Connection Animation
- Orvis Learning Center, Blood Knot Animation
- National Park Service, Fishing safety
- Orvis News, Why Sunglasses are so Important for Anglers
- MedlinePlus, Object in the eye
- Washington Department of Fish and Wildlife, Fishing licenses
- Maine Department of Inland Fisheries and Wildlife, License Requirements