
The short answer
Check the valve and seams first, then listen and feel for escaping air. If that fails, wipe or spray soapy water over one section at a time and watch for bubbles; a sleeping-pad maker says a pinhole can take ten or more minutes. Mark the spot, dry it, and patch it as the maker directs.
If the bed goes soft overnight, first rule out the causes that are not a hole: cooling air and new vinyl that is still stretching. Our guide to why an air mattress keeps deflating sorts those out, so this one starts from the point where you are sure the bed is losing air.
Related guide: How to Fold an Air Mattress: Deflate, Fold, Roll and Store
Finding the leak is the hard part. Patching, once you know where it is, is mostly surface prep and waiting for the glue to hold.
What you need
- A pump that fits the bed, so you can inflate it to normal firmness.
- Liquid dish soap, water, and a sponge, cloth or spray bottle. Intex says laundry and dishwasher detergent will not work because they lack the bubbling effect.
- A marker, as Sleep Doctor’s repair guide suggests, to circle the spot.
- The repair patch that came with the bed, or the maker’s repair kit. Check your manual, because kits differ.
- A clean cloth, and fine sandpaper or an emery board if the top is flocked (velvety).
- Something heavy and flat, such as a book, to hold a glued patch down.
Where holes hide: check in this order
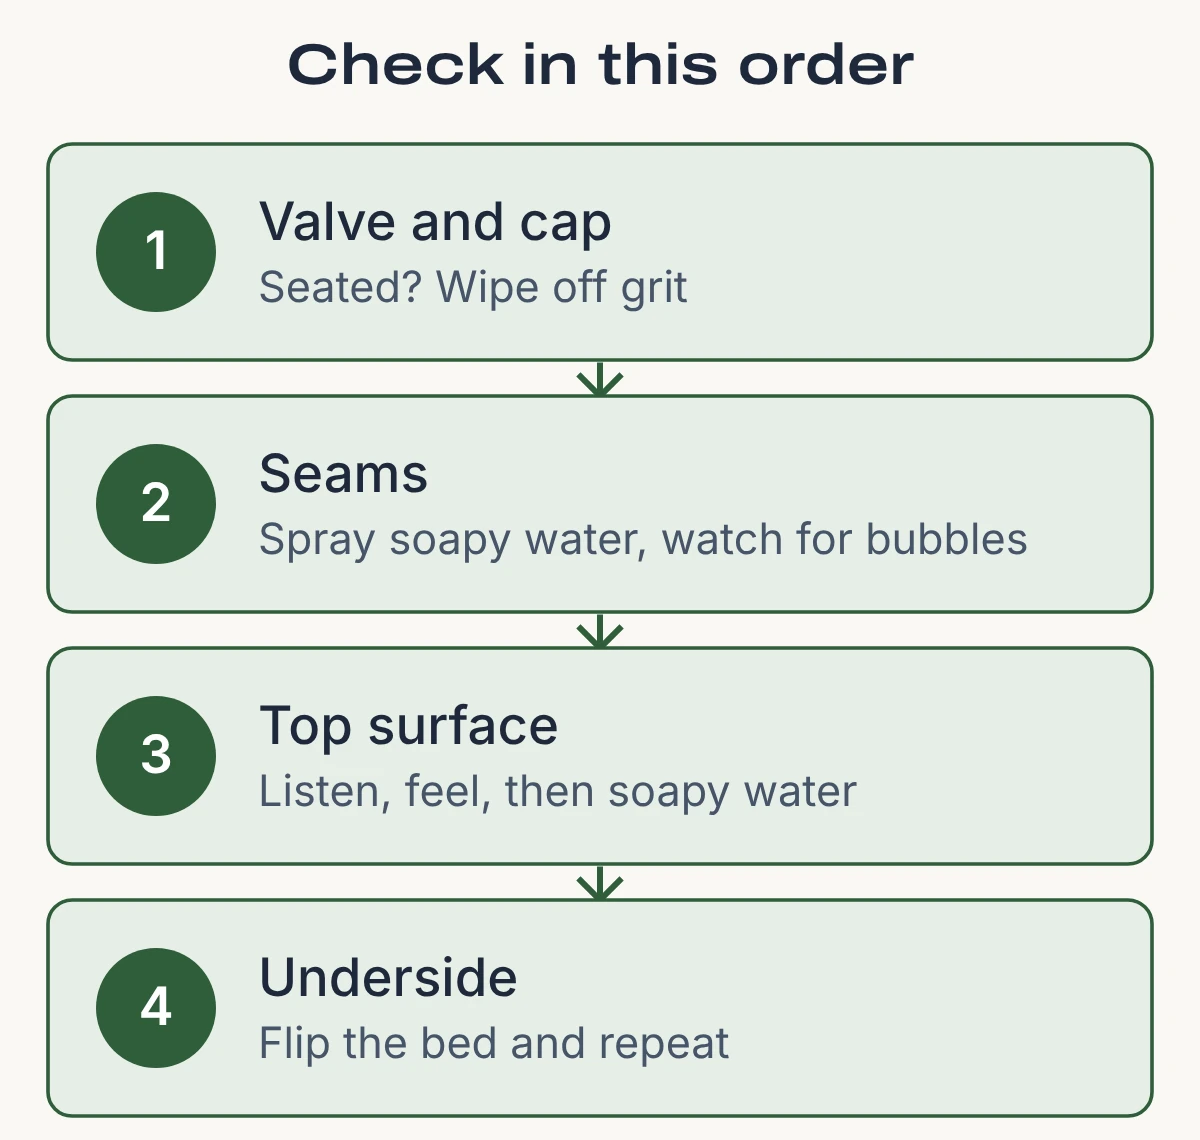
The order follows the makers’ advice and where the repair guides say holes tend to be. Intex’s leak advice starts with the valves: “make sure the valves are secure.” Sleep Doctor, a sleep-advice publication, says “Holes often develop along the seams and surrounding the valve,” and also warns that the underside is exposed to sharp objects.
How to find the hole
Inflate the bed to normal firmness
Use the bed’s own pump and stop at normal firmness; your manual may warn against over-inflating. A flat bed gives air nothing to push out through the hole.
Check the valve and cap
Intex’s FAQ says to make sure the valves are secure and replace one if necessary. Push the cap or plug fully home, wipe off grit, and check that a built-in pump’s control is closed as your manual shows.
Listen, then feel
Bestway says to inflate the mattress and “feel around the surface, sides and seams for any escaping air or noticeable tears,” and to listen while you do. Work in a quiet room, move your hand slowly over the surface, and check the underside too. Therm-a-Rest’s repair advice for its sleeping pads says to flip the pad over and inspect the other side.
Brush or spray soapy water over each section
Intex says to put liquid soap and water in a squirt bottle and spray the seams: “If there is a leak it will bubble.” Bestway says to rub soapy water over the whole surface and look for bubbles. Do one section at a time, seams and valve first, then the top, then flip the bed. Sleep Doctor says to mix enough soap and water to form bubbles, and offers a no-water trick: place a single tissue at one corner, move across the bed, and “You’ll know you’ve found a hole if the tissue balloons up.”
Be patient with a pinhole
Cascade Designs, which makes Therm-a-Rest, says that for a pinhole that takes all night to leak out, “it may take a while for bubbles to form, in some cases ten or more minutes.” That is the maker’s figure for sleeping pads; it is a good reason not to give up on a section after a few seconds.
Mark it at once
Sleep Doctor’s guide says to mark the damaged area with a permanent marker so you can find it again.
Good to know
Submerging the bed in water is a maker method for sleeping pads: Cascade Designs says you can “submerge the pad fully in water” and look for bubbles. For a full-size air mattress, Intex’s washing guidance cuts the other way, saying “Do not submerse airbed into the water” because water saturation may be harmful to some of the materials. For an air bed, stick to soapy water on the surface.
Fixing it with a patch
A small puncture in the flat part of the bed
Let the air out and clean the spot
Bestway says to clean the area with a wet cloth and dish soap or mild detergent, wipe the soap away with a clean wet cloth, and let it dry completely. Cascade Designs says, about its sleeping pads, that patch jobs “fail most often due to poor surface prep,” and tells owners to clean at least a one-inch diameter around the puncture.
Sand off any flocking
Intex says its patch is “designed for vinyl surfaces only,” so on a flocked bed it says to remove the flocking with fine sandpaper or an emery board before applying the patch, and then to clean the area with nail polish removal solution so the patch will adhere. Follow the label on the cleaner, including any ventilation and fire warnings.
Use the patch the way its maker describes
With a self-adhesive patch, Bestway says to remove the film, stick the patch over the hole, press down firmly for 30 seconds while eliminating bubbles, and wait 30 minutes before re-inflating. With a non-adhesive patch, Bestway says to cut it to size without removing its film, coat one side with PVC glue, press the glued side over the hole for 30 seconds, and follow the instructions included with the glue for drying times; follow the glue’s label too, including any ventilation and fire warnings. Bestway says its Tough Guard and ToughLite beds require glue. With Therm-a-Rest’s sleeping-pad kits, the Permanent Home Repair Kit may need to sit overnight, while its Field Repair Kit is designed as a speedy, no-cure fix.
Round the corners and press
Bestway recommends rounding the patch’s corners with scissors to help it stay on longer. Cascade Designs says of pad repairs that it is “the glue that does the actual sealing, not the patch,” so use enough adhesive to cover the puncture and a margin around it. With a glue-cure patch, hold it flat under a weight, as the maker directs.
Wait the full cure time before you inflate
Use the time on your patch or glue label, not a guess. Bestway gives 30 minutes for its patches and glue. Cascade Designs says the adhesive in its home kit has to sit for four hours under a weight. Sleep Doctor says to keep a glued DIY patch weighted for at least eight hours.
Test it
Re-inflate to normal firmness and run the soapy-water test over the patch edges. If bubbles still show, the repair has failed or there is a second hole. Sleep Doctor notes that the bed may have more than one.
Safety
Read the label on any glue or cleaner before you open it, and use it only as the label directs, including its ventilation and fire warnings. This guide does not replace them, and the warnings differ from product to product.
If you have no patch kit
Sleep Doctor’s repair guide is the one source we found that covers this. For any glue or cement, follow its label, including any ventilation and fire warnings. The guide says “Strong adhesives like hot glue, liquid cement, or epoxy are best because they dry airtight,” and that “Cutting a square from a vinyl shower curtain often works well” as a patch. Bestway adds that PVC glue “can be useful for holes in hard to patch locations.” For hot glue, Sleep Doctor says “It’s best to use a low temperature setting” and warns “The hot glue or gun tip can damage certain mattress materials, so use caution with this method.” Treat this as a stopgap: Sleep Doctor says “Even the strongest glue will start to erode over time.” Buy the maker’s patch kit when you can. Patch kits are small, so they also earn a place on our camping packing checklist.
A leak at the valve
Check that the valve is seated before you blame it. On Intex beds the first step is making sure the valves are secure, replacing one if necessary. For its pads, Cascade Designs says most valves can be replaced at home with a valve kit, but that its TwinLock valves can be repaired only in its repair shop, so look up which valve your bed has before you buy parts.
A leak at a seam
Intex’s FAQ is blunt: “If the leak is located in the seam it cannot be repaired.” Cascade Designs says, about its sleeping pads, that seam failures “can be difficult to repair long-term without the specialized laminating equipment” in its shop. Sleep Doctor says a patch will not work on a ripped seam and mentions a glue seal as a temporary measure, adding that the leak returns if the seal cracks. Treat a leaking seam as a replacement or warranty question.
When to stop and use the warranty
A patch is the wrong move on a bed that may still be covered. Sleep Doctor says holes and other damage are sometimes covered by the manufacturer’s warranty, and that “Both the patch and glue approaches will likely void your mattress warranty.” Check your manual first.
- Intex: the warranty depends on the series: a PremAire or Dura-Beam Deluxe bed has a 1-year limited warranty from the date of the initial retail purchase, a Dura-Beam Plus bed 180 days and a Dura-Beam Standard bed 90 days. Intex says “Other types of airbed do not have a warranty,” and that proof of purchase will be required.
- Bestway: its repair article says to submit a claim on its support page if the bed is still under warranty.
- Therm-a-Rest pads: punctures are not covered. Cascade Designs says, for its sleeping pads, “the vast majority of air leaks are caused by punctures, and this is not covered under warranty,” though it may repair one for a small fee.
If a patch holds and the bed still goes soft, or a second leak shows up beside the first, the vinyl may be wearing out. Our guide to the best air mattresses for camping is the place to start if it is time to replace it.
Cleaning a bed before you patch it
Dirt stops a patch sticking, so clean first. Intex says its air bed “can be washed with mild soap and water using a sponge or soft bristled brush,” then rinsed thoroughly and air dried, and never put in a washing machine. Therm-a-Rest’s care page for its sleeping pads also says not to put the mattress in the washing machine. For stains and odors, use your maker’s cleaning instructions.
Why it keeps happening: protect the bed
Bestway lists a few habits to lower the chance of a puncture, including not dragging the bed, keeping it off sharp or hot objects, and putting a sheet or blanket indoors, or a ground cloth outdoors, underneath. Cascade Designs adds that dogs are a common cause of punctures in its sleeping pads. The non-leak reasons a bed softens are in our deflating guide, and if you are still weighing a pad against an air bed, see our sleeping pad vs air mattress comparison.
Ready to buy?
If your bed is past patching, see our roundup of the best camping air mattresses.
Frequently Asked Questions
Q. What is the fastest way to find a hole in an air mattress?
Check the valve and seams, then run a soapy sponge or spray over each section and watch for bubbles. Intex and Bestway both recommend soapy water; Bestway adds feeling and listening for escaping air first.
Q. Why is my air mattress deflating but I can’t find a hole?
A pinhole can take ten or more minutes to bubble, per Cascade Designs writing about its sleeping pads, and the leak may be at the valve. If you still find nothing, the bed may only be stretching or cooling; see our deflating guide.
Q. Can you patch an air mattress without a patch kit?
Sleep Doctor says a vinyl shower-curtain square with a strong adhesive can work. Bestway suggests PVC glue for hard-to-patch spots. Both are stopgaps compared with the maker’s kit.
Q. Can a leaking seam be repaired?
Intex says a leak in the seam cannot be repaired. Sleep Doctor mentions a glue seal, but says the leak returns if the seal cracks or wears away.
Q. How long should a patch dry before I inflate the bed?
It depends on the product. Bestway says 30 minutes, Cascade Designs says its home kit’s adhesive needs four hours under a weight, and Sleep Doctor says at least eight hours for a DIY glue patch.
Q. How do I find a hole in a self-inflating mattress?
Cascade Designs, which makes self-inflating pads, says to inflate it, listen, then submerge it or wipe it with a wet, soapy cloth and look for bubbles. See its repair pages for the kit that fits your pad.
Sources (7)
- Intex, Airbed FAQs (leaks, patching, warranty, washing; text file)
- Bestway USA, How to Find and Patch a Hole in an Air Mattress
- Cascade Designs, How do I find an air leak in my Therm-a-Rest sleeping pad?
- Cascade Designs, How do I repair or patch a leak in my Therm-a-Rest sleeping pad?
- Cascade Designs, Can a leaky seam on my Therm-a-Rest be repaired?
- Cascade Designs, Can I replace the valve on my Therm-a-Rest mattress?
- Sleep Doctor, How to Fix a Hole in an Air Mattress