The short answer
Seat the reel on a casting rod, spool the line to about 1/16 to 1/8 inch (1.5 to 3 mm) below the spool lip, then set three controls in order: spool tension first, brake second, drag last. Tension is right when your lure falls on its own and the spool stops turning the moment it lands.
A baitcaster has three adjustments that a spinning reel does not: the spool tension knob, the brake and the star drag. Makers agree on the order more than on the numbers, so each step below gives the maker’s own method and says where two of them differ.
Related guide: How to Set Up a Spinning Reel: Mount It, Spool It and Set the Drag
Related guide: How to Cast a Baitcaster Reel Without Backlash, Step by Step
Shimano’s own pages did not load, so the Shimano notes below come from USAngler, a fishing publication. Check your model’s manual for its exact controls.
What you need
- A baitcasting reel and a casting rod. Bass Pro Shops says baitcasting rods are built with “the reel seated on the top, above a trigger grip”.
- Line: monofilament or fluorocarbon, or braid with a monofilament backing under it.
- A pencil or a spooling station to hold the filler spool, and scissors.
- A towel, if the line is braid.
- The lure you plan to fish, for the tension test.
- Optional: a spring scale, to set the drag.
Note
A fishing licence comes before the first real cast. The U.S. Fish and Wildlife Service says “First, you’ll need a fishing license” and “Every state has slightly different rules, so look up your state for state-specific requirements.”
The three controls, and the order to set them
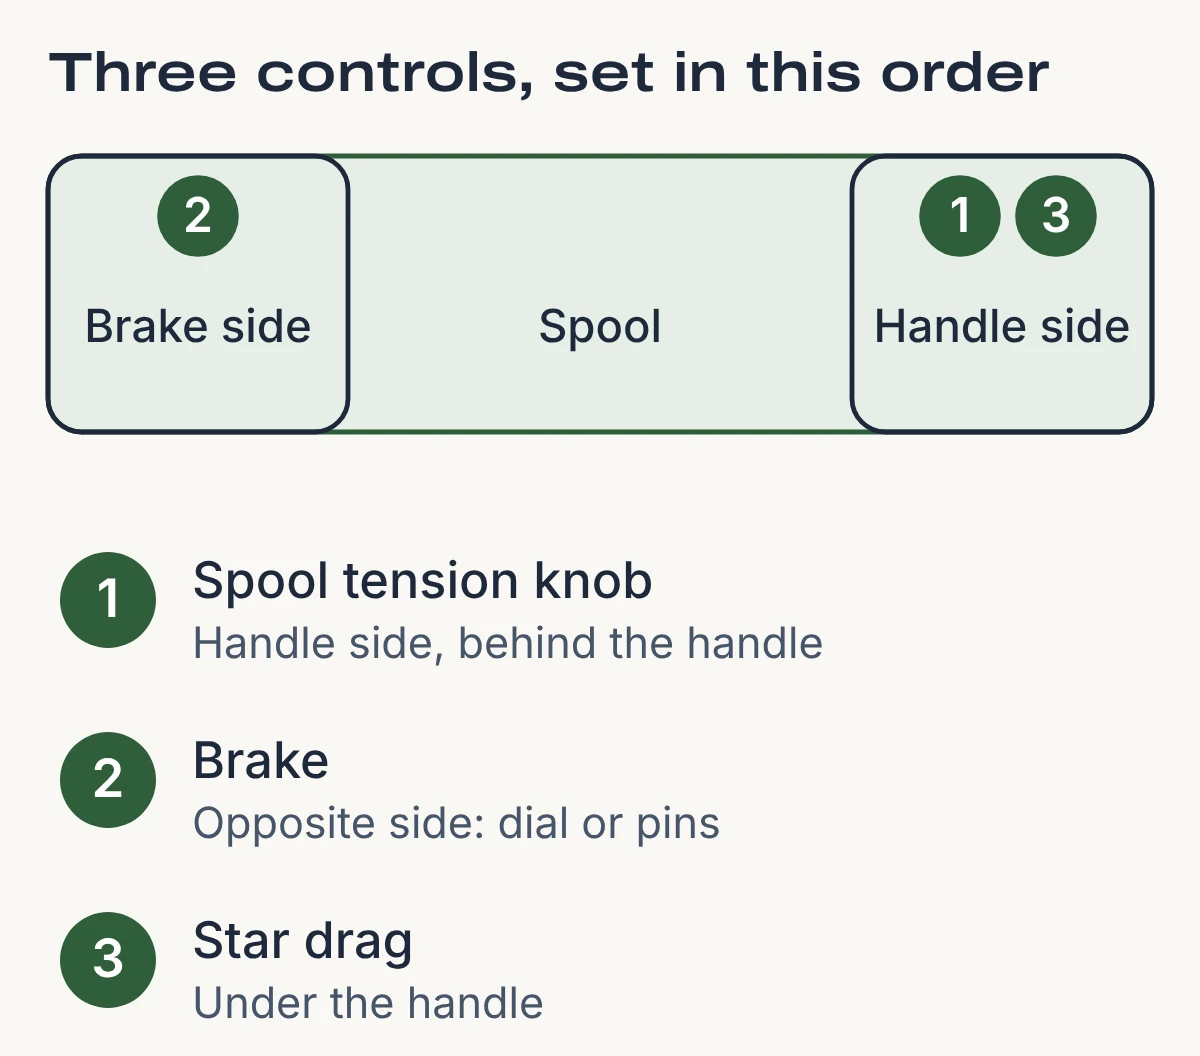
Daiwa describes the layout plainly: the spool tension knob is “on the handle side of the reel” and the mag dial is “on the opposite side”. The star drag sits under the handle. Daiwa says to adjust the tension knob first, then the brake.
Set up the reel step by step
Check the handle side
QuoreLynx, a reel brand, says the left or right label “describes the handle retrieve side, not the primary hand used to cast the rod”, and that “There is no rigid rule stating your reel handle orientation must match your dominant hand.” The side is fixed when you buy: QuoreLynx says baitcasting frames “are fixed and side-specific”, and Lew’s reel listings ask you to “Select Hand Retrieve” left or right. Choose the side before you buy.
Mount the reel on the rod
The Fishing Manual, an online fishing guide, says to loosen the locking nut, slide the reel foot into the seat so it “sits flush”, and tighten the nut by hand until the reel does not wobble: “Snug is enough; you do not need tools.” A baitcaster sits on top of the rod. Give the reel a gentle wiggle to confirm it will not shift. If you still need a rod, our roundup of baitcasting rods for bass compares eight.
Pick the line, and add a mono backing if it is braid
Abu Garcia says its Revo reels are made for monofilament, braid and fluorocarbon, and that “Some anglers prefer to add a monofilament backing” under braid to reduce line slip. Lew’s goes further: “Braided line will slip on a spool regardless of the knot used. A monofilament backing eliminates this problem.” Lew’s pro Kevin Short fills the spool one half to three quarters full with 8 to 10 lb mono backing, which Lew’s calls a cost-saving measure. Tackle Warehouse, a retailer, says to wrap the spool with “a few yards of monofilament backing or a piece of electrical tape” before loading braid.
Thread the line through the rod guides and the reel’s line guide
Run the line from the filler spool through the rod guides, tip first, then through the reel’s line guide, the small guide on the front of the reel. Lew’s warns the last part “is an easy step to forget”. Abu Garcia’s manual says to start the spooling by passing the line through “the guide located on the front of the reel.”
Tie the line to the spool with an arbor knot
Abu Garcia’s manual says to secure the line “using the arbor knot”, and Lew’s says to use it if the spool has no holes. Tackle Warehouse’s steps: “Tie a basic overhand knot, nothing fancy here. Leave a little bit of line for a tag end, about an inch will do.” Then wrap the line around the spool and tie a second overhand knot by taking the tag end over the mainline and through the loop. Cinch it, then “Pull the mainline until your two knots meet each other and are tight against the spool.” Cut the tag end. If the spool has holes in the centre, Lew’s says to push the line through until it shows about an inch on the other side, press your thumb on the line and spool, and crank four or five times.
If you are using braid, wind on the backing first
Abu Garcia says to “fill the spool with enough monofilament line to cover the spool”, and Lew’s pro Kevin Short “fills the spool one half to three quarters full of backing”. Thread and tie the backing as in steps 4 and 5, wind it on with the pressure described in step 8, then cut it. Run the braid from its filler spool through the rod guides and the reel’s line guide, as in step 4. Skip this step and the next with mono or fluorocarbon only.
Join the braid to the backing
Abu Garcia names two choices: “uni-to-uni knot, Albright knot or equivalent”. Lew’s names a blood knot to join the backing to a mono or fluorocarbon main line and “the thin FG knot” if the main line is braid. For the uni-to-uni, Bass Pro Shops says to “Overlap about 12 inches of the ends of two lines” and to “Form a Uni-Knot circle with the tag end of line” A. Wrap it five times around line B, then snug it “with enough tension to close the wraps, but not so tight that it actually grips” line B. Repeat with the tag end of B around A, and “Use 8-10 wraps when using braided line.” Slide the two knots together “until they jam”, “then pull tight”, and “tighten the wraps around the standing lines by firmly pulling the tag ends of each Uni-Knot.” Last: “Snip the tag ends.”
Fill the spool under tension, and stop short of the lip
Put a pencil through the filler spool so the line comes off the top, and keep firm pressure on the line with your fingers so it packs on tightly. Lew’s warns that “A towel is absolutely necessary when spooling braided line, which requires such heavy pressure it would burn or cut your bare fingers.” Makers give slightly different stopping points. Abu Garcia says about 1/16 inch (1.5 mm) below the top of the spool and “Do not overfill.” Lew’s says about 1/8 inch (3 mm) from the top, and that “Overfilling a spool invites backlashes.” Tackle Warehouse says to stop “about 1/16 of an inch from the spool lip”. It also says an underfilled reel “is totally capable of being fished” but casts shorter and retrieves slower. Abu Garcia and Lew’s each give their own mark; stop at either.
Set the spool tension knob
Sources differ on where the brake sits for this test. Kevin VanDam says to “turn that braking system to zero”, USAngler says to work “with the braking system set as light as possible”, and KastKing’s Craig Smith says to “turn your brakes to the highest setting”, normally 10. Daiwa and Lew’s give no brake position. Pick one and keep it there for the test. Then hold the rod at about 2 o’clock with the lure hanging a few inches below the tip, as Lew’s describes. Abu Garcia says to place the tip of your thumb on the line to hold the spool, then press the thumb bar with the pad of your thumb to free the spool. Release the spool, let the lure fall and watch. If the lure does not fall, Abu Garcia says to turn the knob counterclockwise to reduce tension. If it falls and the spool keeps turning, “spool tension is too loose”, so turn the knob clockwise. Lew’s goal is a lure that falls “in free spool” with the spool stopping when the lure hits the ground. Daiwa gives the same test and adds a check: tighten “until there is limited sideways movement of spool”, but only enough that the spool does not overrun. USAngler puts a time on the fall: “Think two to three seconds”, and slower for a true beginner. On his own site, Kevin VanDam sets it tighter for first-timers, so the bait “just barely” starts to fall. Redo the test whenever you change lure weight, as USAngler says. Some newer Daiwa reels have a preset Zero Adjuster, which Daiwa says “doesn’t need to be adjusted when you first use and set up the reel”.
Set the brake
Find which kind your reel has. A magnetic brake is a dial on the outside. Abu Garcia says turning its dial toward the MAX label moves the magnets closer to the spool, where they “apply more braking force and slow the rotation of the spool”. Lew’s pro Mark Rose sets the magnetic dial to 5, “halfway on a Lew’s reel”, and Daiwa says to set its mag dial after the tension, “to suit your casting needs and casting ability”. A centrifugal brake is a set of pins or weights under the side plate. On Abu Garcia’s centrifugal reels, “Any combination of brake blocks can be engaged or disengaged”: all six give the most braking, and one or two give “less pressure and more distance”. For Shimano’s SVS Infinity brakes, on models like the Curado K, USAngler’s editor recommends that new anglers “start with all four brakes on” and warns that “the higher the settings, the shorter the cast”. Makers differ on the starting point. Kevin VanDam turns the brake to zero, sets tension, then brings his centrifugal brake up to about three-quarters. KastKing brand ambassador Craig Smith turns his brakes to the highest setting, usually 10, before the tension test. Lew’s fine-tunes in small steps: “I always start with a one notch adjustment and go from there.”
Set the drag
The star drag is under the handle, per Lew’s. Abu Garcia says to set it to “approximately one-third of the breaking test of the line being used”, ideally with the line tied to a spring scale, after the reel is on the rod and the line is through the guides. Without a scale, The Fishing Manual, writing about a spinning reel, says to set the drag so that when you pull the line by hand it “gives way with firm, steady resistance, not so loose it slips constantly and not so tight it feels locked.” That is a rough start; the measured fractions here need a scale. Abu Garcia’s manual adds that “Any drag setting above half of the line strength risks line breakage” and that the drag should release before the line reaches its breaking point. Lew’s says “about 25 percent of the line’s strength”, which is 3 lb on 12 lb line. One third of 12 lb is 4 lb (worked out from Abu Garcia’s fraction), so the two makers sit about a pound apart on 12 lb line.
Make one easy test cast
Cast the lure you tested with, somewhere nobody is in your path. The Oklahoma Department of Wildlife Conservation, writing about a spincast lesson, says “The key thing to remember when casting is SAFETY! Remember you have a hook swinging from the other end of the line!” and, mid-cast, “Now look behind you to make sure nobody is standing there or that no objects are in the way before you finish your cast.” The National Park Service adds “Only cast where fishing is permitted”. Lew’s keeps the first cast gentle: “When test casting, I’m not trying to cast far and hit the other side of the bank, just nice and easy to get a feel for it.” If the spool overruns, Abu Garcia says to tighten the spool tension knob half a turn at a time until the overrun stops. Casting technique and clearing a backlash are covered in a separate guide.
Ready to buy?
Not bought a reel yet? Our roundup of beginner fishing reels compares eight picks and explains how the reel types differ.
Where the makers differ
| Setting | Abu Garcia | Lew’s | Daiwa | Others |
|---|---|---|---|---|
| Fill level | 1/16 in from top | about 1/8 in from top | no figure | Tackle Warehouse: 1/16 in |
| Drag | about 1/3 of line | about 25% of line | no figure | USAngler: 1/4 to 1/3 |
| Tension test | lure falls, spool stops | lure falls, spool stops | limited side play | USAngler: 2 to 3 seconds |
| Brake start | fine-tune after tension | magnetic dial at 5 | mag dial after tension | VanDam: zero, then 3/4; KastKing: highest |
The numbers differ because lure weight, line and casting skill change the answer. Lew’s says “As you fish with the reel and your thumb control improves, you will likely fine-tune this adjustment.” Once the reel is set, our bass fishing tips for beginners cover gear, rigs and a simple first day.
Common mistakes
- Skipping the reel’s line guide. Lew’s says it is an easy step to forget.
- Braid straight onto a bare spool. Lew’s says braid slips whatever knot you use.
- Overfilling. Lew’s says it invites backlashes. Tackle Warehouse says it can cause a bird’s nest while casting.
- Fine-tuning the brake before the tension is set. Daiwa says “the first thing you want to adjust is the spool tension knob”, and VanDam says to “set the spool tension first and then adjust your centrifugal brake”.
- Setting tension once for every lure. USAngler says pretty much every lure weight change needs a new tension setting.
- Tension too tight. Lew’s says “casting distance will be greatly reduced”. Too light, and “backlashes are inevitable”.
Frequently Asked Questions
Q. What settings should my baitcaster be on?
There is no single setting, because lure weight changes it. Start with the tension that lets the lure fall on its own and stops the spool on landing, take a brake number from your maker (Lew’s magnetic dial at 5, or VanDam’s centrifugal at about three-quarters), and set the drag between a quarter and a third of the line’s strength.
Q. Do I need backing when I spool braid?
Abu Garcia, Lew’s and Tackle Warehouse all say braid slips on a bare spool. Lew’s says a mono backing solves it, and Tackle Warehouse allows electrical tape on the spool as an alternative.
Q. How tight should the spool tension be for a beginner?
Tighter than an experienced angler would run it. Abu Garcia says to start an extra quarter to half a turn tighter than the lure-drop test and back off slowly as you learn.
Q. How do I set a baitcaster so it never backlashes?
No setting removes it. Abu Garcia says it “is normal to experience backlashes when learning how to cast a low profile reel”. KastKing’s Craig Smith says you “don’t have to throw the bait so hard” and should let the rod load.
Q. How do I set up a Shimano baitcaster?
Follow the same order: tension, then brake, then drag. USAngler says some Shimano reels use centrifugal brakes set through a side plate and an external dial, so check your model’s manual for its brake weights.
Q. How do I set the gears on a baitcaster?
Daiwa describes two adjustable parts, the spool tension knob and the mag dial, and the star drag is the third. QuoreLynx says to check the product listing for gear ratio, so treat it as a spec you choose when buying.
Sources (17)
- Abu Garcia, Revo Low Profile Instruction Manual (maker)
- Lew’s, Setting Up Your Baitcasting Reel (maker)
- Lew’s, How to Spool a Baitcast Reel (maker)
- Lew’s, How to Adjust and Cast a Lew’s Baitcaster (maker)
- Daiwa, How to Set Up a Baitcaster: Daiwa Tech Tips (maker)
- KastKing, How To Use A Baitcaster (maker)
- KVD Outdoors, How to Set Up Your Baitcaster Reel Like a Pro by Kevin VanDam (pro angler’s site)
- USAngler, How To Set-Up a Baitcasting Reel (publication)
- Tackle Warehouse, How-To Spool a Baitcasting Reel (retailer)
- Tackle Warehouse, How-To Tie An Arbor Knot (retailer)
- Bass Pro Shops, Using the Uni-Knot to Join Two Fishing Lines (retailer)
- Bass Pro Shops, Baitcasting Rod Buyer’s Guide (retailer)
- The Fishing Manual, How to Set Up a Fishing Rod (guide site)
- QuoreLynx, Left vs Right-Hand Baitcaster (reel brand blog)
- U.S. Fish and Wildlife Service, Purchase a Fishing License (agency)
- Oklahoma Department of Wildlife Conservation, Knots and Casting Techniques (agency)
- National Park Service, Fishing Safety (agency)