The short answer
Tie braided Dacron backing to the reel’s arbor with an arbor knot, wind it on under steady tension, and stop at the amount your reel maker’s capacity chart gives for your fly line. Join the fly line to the backing with an Albright knot or a loop-to-loop connection, then wind the line on and check the clearance.
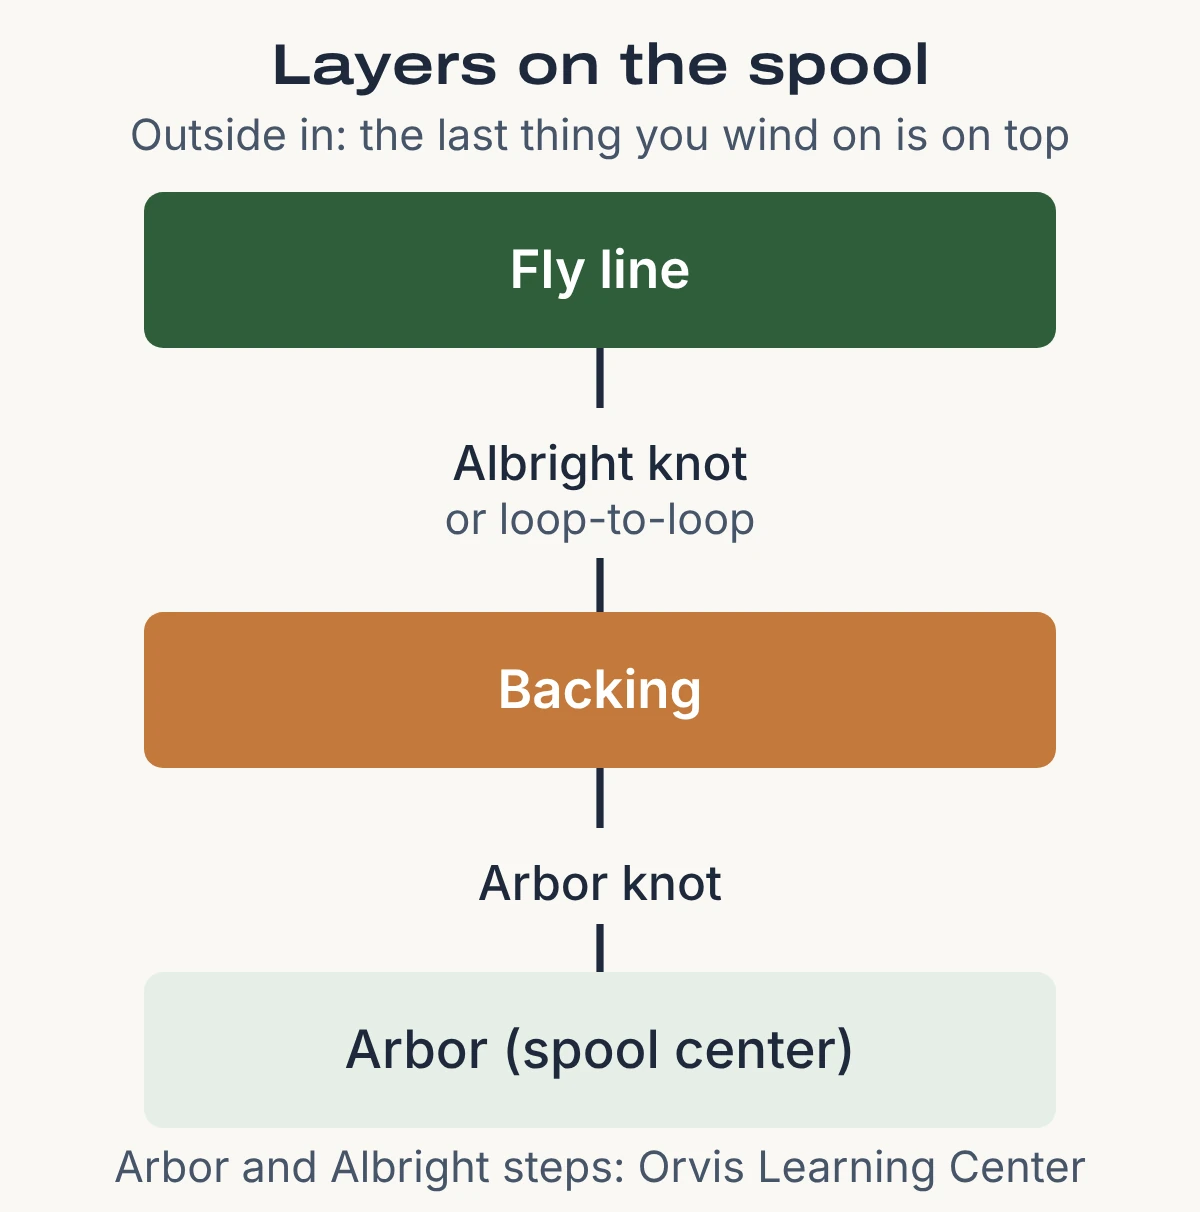
A fly reel is loaded in layers: backing first, fly line on top, leader at the far end. Backing does two jobs. Texas Freshwater Fly Fishing, a Texas fly-fishing blog, says it “provides extra line in the event that the fish runs further than your fly line” and “enlarges” the arbor, so each turn of the handle picks up more line. This guide covers the first two connections, arbor to backing and backing to fly line. The leader is the next job.
Spooling a fly reel is different from filling a spinning reel, which takes one line straight onto the spool; for that, see our guide to putting fishing line on a spinning reel.
What you need
- Your reel, with the retrieve hand already set. Orvis, a fly-fishing maker and retailer, lets buyers “Choose Right (RH) or Left (LH) Retrieve” when it mounts a Hydros reel, and lists a “Tool-free LH/RH retrieve conversion” on that reel. Texas Freshwater Fly Fishing says to “Make sure your reel is set properly for you” before you tie anything on. Check the maker’s manual if you need to change it.
- Backing. Orvis sells braided Dacron backing and says “20-lb. test is for trout, bass, and most freshwater fishing” and “30-lb. test is great for steelhead, salmon, bonefish, stripers, and more.”
- Your fly line. Know which end goes on the reel first. Into Fly Fishing, a fly-fishing website whose author Kevin Main is a professional guide in Alaska, says: “Make sure you know which end of your fly line goes onto the reel first.” The line’s package or tag marks it.
- Snips and pliers. Murray’s Fly Shop, a family-owned Virginia fly shop and guide service, says you “will find a pair of snips and pliers handy” when rigging a reel. Forceps help with the Albright knot (step 3 below).
- A way to feed the spool under tension. Texas Freshwater Fly Fishing pushes a pencil through the backing spool and rests each end in a hole in a cardboard box; a helper holding the spool works too.
Good to know
A fly shop will do all of this for you. MidCurrent, a fly-fishing publication, says you “also have the option to have your backing and fly line loaded onto the reel by your local fly shop.” If you would rather start with a simpler spinning outfit, see our roundup of beginner spinning and spincast reels. They need no backing.
How much backing to put on
Start with the maker’s chart. MidCurrent says a “line capacity table” should be on the reel maker’s website or on the reel box, and that it tells you how much backing the reel holds with different line weights. The amount changes with the line you spool over it, because a heavier line takes more room.
Related guide: How to Set Up a Baitcaster Reel, From the Box to a Test Cast
Orvis publishes one in the manual for its Mirage reel, headed “Mirage Big Game Reel Capacity Chart,” with the note “20-lb Dacron Backing” for the figures below. It shows the pattern clearly. This is one maker’s chart for one reel family; other makers differ, so use the chart for your own reel.
| Reel | Lightest line | Middle line | Heaviest line |
|---|---|---|---|
| Mirage II | WF3: 150 yds | WF4: 125 yds | WF5: 100 yds |
| Mirage III | WF5: 150 yds | WF6: 125 yds | WF7: 100 yds |
| Mirage IV | WF7: 225 yds | WF8: 200 yds | WF9: 175 yds |
Backing capacity in yards for the three smallest Mirage sizes, from Orvis’s Mirage manual (larger sizes and heavier lines are on the same chart). Worked from the chart: each step up in line weight on the same reel costs 25 yards in all three rows.
Related guide: How to Cast a Baitcaster Reel Without Backlash, Step by Step
If you have no chart, you have two fallbacks, and both are rough guides:
- A round number. MidCurrent says a trout reel for a 4- or 5-weight line can “probably expect to put around 100-125 yards of backing” and still leave room for the line. Its writer adds that most anglers “spool their reel with as much backing as possible,” which speeds the retrieve. Into Fly Fishing gives a lower rough figure for a 5-weight trout reel, “50 to 100 yards of 20 lb dacron behind the fly line,” so treat both as approximations.
- Measure it on the reel. Into Fly Fishing’s Kevin Main loads “everything in reverse.” You wind the whole fly line on first, wind backing over it “until you reach a fill level of about 1/8 to 1/4 inch from the outer rim of the reel cage,” mark that point, strip it all off, and load backing first, then line. The 1/8 to 1/4 inch figure is his, not a maker’s. Orvis News also posted a video by Tim Flagler of Tightline Productions that shows his method for getting “just the right amount of backing” on a reel.
You will rarely use all of it, with exceptions. MidCurrent says “Other than when fishing for large freshwater species like salmon, big lake trout or musky,” the chances of a fish taking a large share of your backing are low, and that “even the strongest type of fish might take you only a third of the way into your backing.” It adds that “most bonefish rarely take out more than 50 to 75 yards of backing.” If you fish for salmon, big lake trout or musky, expect a run to take more than a third of your backing, so fill the reel to its chart figure. The backing’s strength seldom matters either: MidCurrent notes the “tippet will break long before your backing” outside saltwater.
Put the backing on the arbor
Tie the arbor knot
Follow Orvis’s Learning Center, which lists three parts. First, “Tie an overhand knot in the backing and loop the backing around the arbor.” Tie that first knot near the end of the backing, because it is the stopper the second knot jams against; Texas Freshwater Fly Fishing says “Start by tying an overhand knot in your backing. Trim off the excess.” Second, “With the tag end, tie a second overhand knot around the standing part of the backing.” Third, “Pull the second knot tight against the arbor, then pull on the standing part of the line so the knotted tag end snugs up against the first.” Then trim the tag end short, as Into Fly Fishing does: “Trim the tag end short.”
Wind the backing on under steady tension
MidCurrent says to pay attention to “winding it on evenly and with adequate tension” so the backing does not go “biting in” to itself. Murray’s says “constant steady and firm tension is very important” when you put backing on for the first time. Feed the line from your spool holder, turn the handle the way you reel in, and keep the layers level from side to side.
Stop at your amount
Use the chart figure, or stop when the layers reach your measured mark. If you are going by eye, remember the fly line still has to fit on top. Texas Freshwater Fly Fishing adds: “You don’t want it higher (more line) on one side than the other.”
Join the fly line to the backing
Two joins are common. The Albright knot works on any fly line. The loop-to-loop needs a loop at the end of each line.
Albright knot. Orvis’s Learning Center says the Albright “can also be used to attach backing to fly line.” Murray’s rigging guide starts with “an Albright Knot to attach the fly line to the backing.” Orvis’s four parts, in order, with the fly line as the loop line (Orvis puts the loop in “the larger line,” which we read as the fly line here) and the backing as the “smaller line”:
Make the loop and pinch the backing in
“Bend a loop in the tag end of the larger line. There should be at least 4 inches of overlap.” Then pass the backing through the loop and pinch it against the fly line “such that there are about 2 inches of the tag end of the heavier line extending beyond your fingers, and about 3 inches of the lighter line.”
Wind the backing around the doubled line
Wind it “around the doubled section of the heavier line, working toward the loop.” Orvis says to make “5 to 12 smooth and closely spaced turns-more if the lines are very different in size, fewer if they are very similar.” Finish by passing the backing through the loop “on the same side of the loop that it entered.”
Tighten slowly
“Slowly tighten by pulling the standing parts of both lines. Work the coils toward the end of the loop, but don’t let them slip off.” Near the end, Orvis tightens by “alternately pulling on the tag end and the standing part of the lighter line,” repeating until tight, and ends with “Grip the tag end of the lighter line with forceps and pull once more to completely tighten.”
Test it and trim
“Pull hard on the standing parts of the lines to make sure the knot will not slip, then trim the tag ends.” Stop if it slips; re-tie it rather than trusting it to a fish.
Murray’s notes the backing bites into the fly line’s coating and says that is fine because “the strength of the fly line is in the core not coating.” Murray’s also puts Aquaseal or Pliobond on the join so it passes through the guides smoothly, which it calls a personal preference.
Loop-to-loop. Into Fly Fishing says this join “requires a factory-welded loop on your fly line” and that most modern lines have one. You tie a loop in the backing end (Main uses a double or triple surgeon’s loop; MidCurrent says Dacron can also be spliced into a loop by “someone who is good with knots”). Then, per Main: “Pass the backing loop through the welded loop on your fly line. Then pass the entire fly line spool back through the backing loop,” and pull the fly line and backing apart to lock it. Main says the Albright is the fallback if your line has no welded loop.
Load the fly line and check the fill
Wind the fly line on under the same tension
Murray’s: “Wind the fly line onto your reel under constant and steady tension.” Loose layers can pull into the layer below under a hard run, which is how backing and line jam. Murray’s warns the resulting knot “will surely take more time to untangle than you will have when your fishing is pulling line at 30mph.”
Check the fill
Murray’s says to “check to make sure your line is not rubbing the reel frame.” If it “is close or is touching the pillars,” Murray’s says to “strip your line off the reel and remove some backing,” then start over with the join. Too little backing has its own cost: Texas Freshwater Fly Fishing says backing “enlarges” the arbor, which picks up more line per turn.
The reel is loaded. The leader attaches to the other end of the fly line. We cover that join separately, along with putting the rod together and running the line through the guides.
Tip
Check the backing yearly. MidCurrent says Dacron “can eventually degrade,” so it is good to “check the strength of the first 25-50 feet every year.”
Common mistakes
| Mistake | What goes wrong | Fix |
|---|---|---|
| Spooling with slack | Layers pull into each other and jam under a run (Murray’s) | Re-spool with steady tension |
| Too much backing | The line rubs the frame (Murray’s) | Strip the line and remove backing |
| Albright coils slip off | The join loosens (Orvis) | Work coils toward the loop’s end while tightening |
| Wrong amount, no chart | Line too close to the rim, or too little backing | Use the reverse-load method (Into Fly Fishing) |
| Guessing the line end | The wrong end of the line ends up on the backing | Find the reel-end tag (Into Fly Fishing) |
Before you take it fishing
The California Department of Fish and Wildlife says “A sport fishing license is required for any person attempting to take fish” and sells the resident license to residents “16 years of age or older”; that is one state’s rule, and ages and exemptions vary. Check your state’s wildlife agency before you go. Our fishing gear hub lists what else you may need.
Frequently Asked Questions
Q. How much backing do I put on a fly reel?
Use the line capacity chart from your reel’s maker. Without one, MidCurrent suggests about 100-125 yards for a reel for a 4- or 5-weight line (Into Fly Fishing says 50 to 100 for a 5-weight), and the reverse-load method lets you measure your own reel.
Q. What kind of backing should I use?
For trout and most freshwater fishing, Orvis recommends 20-lb. test Dacron. Orvis lists 30-lb. test for steelhead, salmon, bonefish and stripers.
Q. How do you attach backing to a fly reel?
With an arbor knot: an overhand knot in the backing, the backing looped around the arbor, and a second overhand knot around the standing part, tightened against the arbor.
Q. How do you tie backing to fly line?
With an Albright knot, or a loop-to-loop if your fly line has a welded loop. The steps above follow Orvis’s Learning Center for the Albright.
Q. Do I need backing on a fly reel at all?
Backing gives reserve line for a long run and fills the spool so each turn retrieves more. Into Fly Fishing says that for most freshwater trout fishing “you can skip backing and fill with fly line,” but you give up the reserve and the faster retrieve.
Q. Can a shop do this for me?
Yes. MidCurrent says fly shops can load backing and line, and “almost always have a machine designed for spooling backing smoothly and tightly.”
Sources (11)
- Orvis Fly Fishing Learning Center, Arbor Knot Video
- Orvis Fly Fishing Learning Center, Albright Knot Video
- Orvis, Hydros Reel (retrieve options)
- Orvis, Mirage Reel Manual (capacity chart)
- Orvis, Dacron Backing
- Orvis News, Video: How to Set Up a Fly Reel
- MidCurrent, How Much Backing Do You Need on a Fly Reel?
- Murray’s Fly Shop, Rigging Your Reel & Fly Line
- Into Fly Fishing, How to Attach Backing to a Fly Reel
- Texas Freshwater Fly Fishing, How to Put Backing on a Fly Reel
- California Department of Fish and Wildlife, Sport Fishing Licenses and Report Cards