The short answer
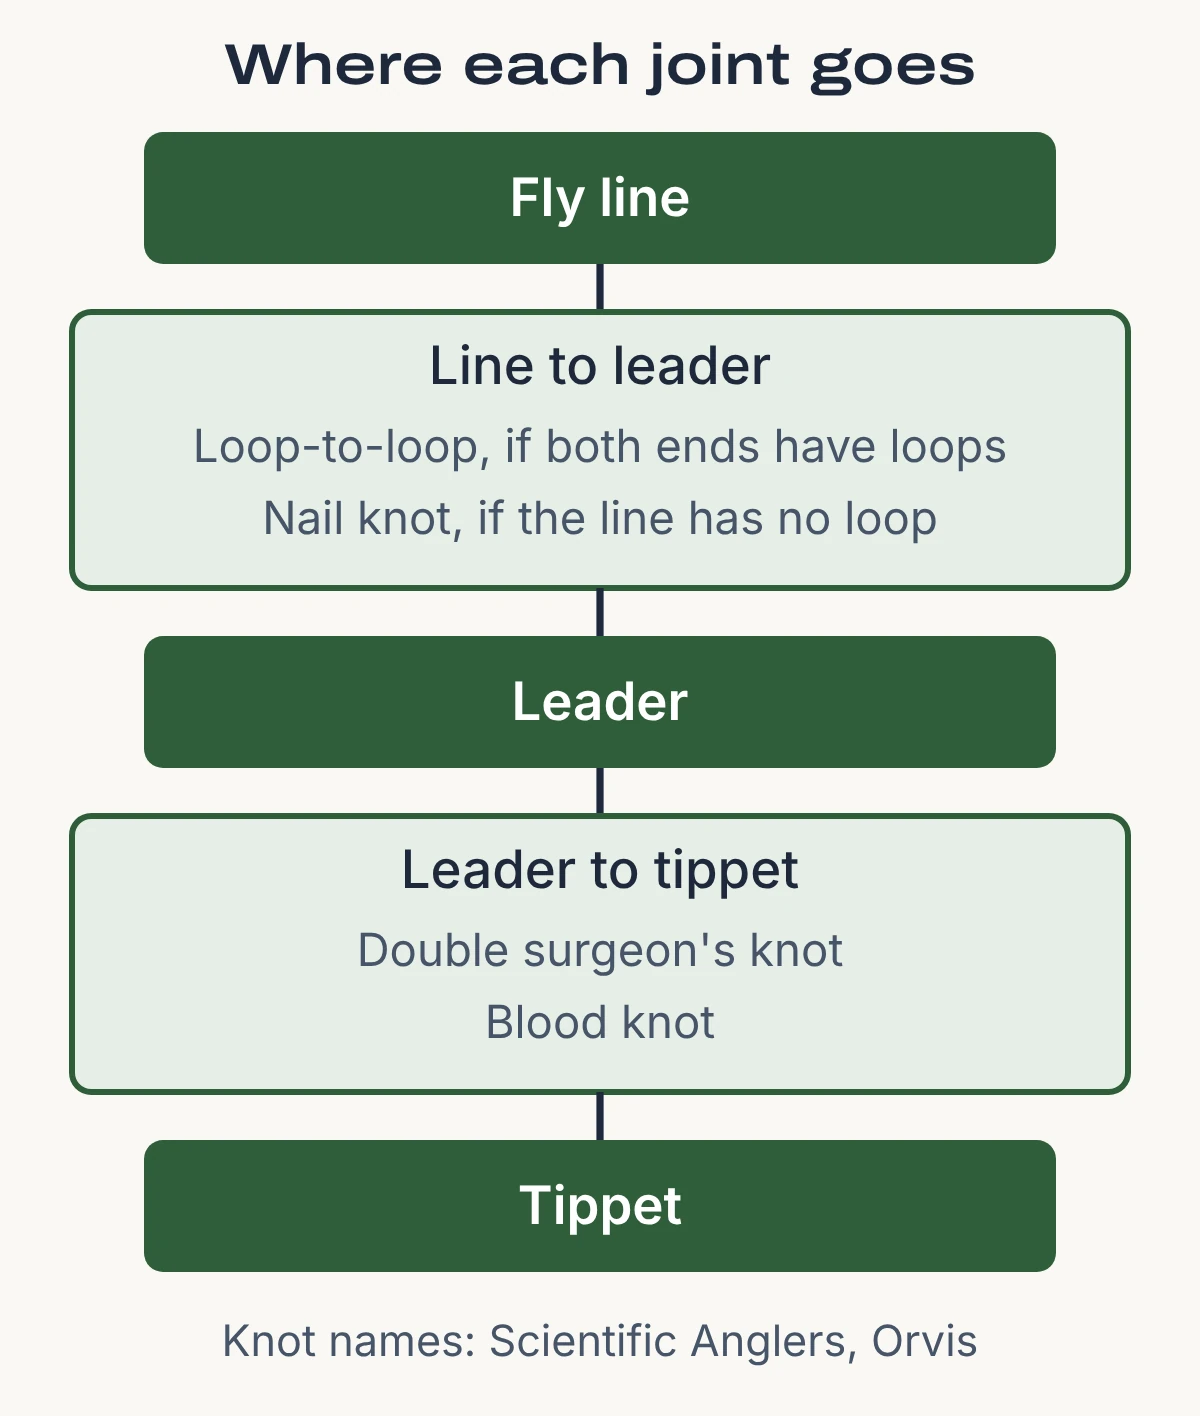
If your fly line and leader both end in loops, pass one loop through the other and pull until they lock; there is no knot to tie. If the line has no loop, use a nail knot. Add tippet to the leader with a double surgeon’s knot or a blood knot. Wet each knot before you tighten it.
The joint between line and leader has to hold, and it has to be small enough to run through the rod guides. Chico Fernandez, who runs a fly-fishing school and whom MidCurrent’s contributor page calls “a renowned fly fishing instructor, lecturer, and author,” writes in MidCurrent of a bonefish lost because “the knot joining the fly line to the butt section of the leader was too big to pass through” the rod’s tip-top. Which joint you tie depends on how your line and leader were made, and that takes about a minute to check.
Related guide: How to Set Up a Tenkara Rod: Line, Tippet and Fly, Step by Step
The same few knots cover every case here. Scientific Anglers (SA), a fly-line maker, says the double surgeon’s knot is “The easiest and fastest fly fishing knot for attaching the tippet to the leader in all kinds of conditions.” This guide covers the line-to-leader joint and the leader-to-tippet knot. Backing knots and tying on the fly are separate jobs; for the rest of your gear, see our fishing gear hub.
Related guide: Easy Fishing Line Knots: Which Ones to Learn and When to Use Each
What you need
- Your fly line, with its loop end or bare end in reach. SA says “Most lines now come with a welded loop and leaders with a Perfection Loop.” Look at both ends before you pick a method.
- A leader, and a spool of tippet for the leader-to-tippet knots. Sizing the tippet is its own question; this guide only joins the two.
- Nail clippers. SA says “A pair of nail clippers is the only tool you’ll need to assemble them,” meaning the pieces of the system.
- For the nail knot, a small tube or a nail-knot tool. SA calls for “a small diameter tube, such as the barrel of a ballpoint pen, a nail knot tool, or other similar object about twice the diameter of the fly line.”
- Practice line. SA suggests “A leader, a piece of rope, or best of all, some old fly line” for practicing knots before you tie them for real.
- A fishing license, before you go to the water. Most states require a fishing license above a set age, and the age varies by state; check your state’s wildlife agency before you go. Washington’s wildlife department says “All fishers age 16 and older need a fishing license,” and Florida’s says “If you cast a line or catch and release, you need a fishing license.” Those are two states’ rules, not a national one.
Safety
Tie these knots with no fly on the leader. A hook near your fingers while you pull a knot tight is an easy way to get stuck. If a hook is in someone, get medical help. SA also says “Never discard used monofilament anywhere but in a trash receptacle or recycling bin,” so keep your clipped tag ends and old leader out of the water and the bank.
Which joint do you need?
Pick from what is on the end of your line. The table follows what SA, Orvis and MidCurrent say about each knot, and each cell names its source.
| Joint | Use it when | Trade-off |
|---|---|---|
| Loop-to-loop | The line has a loop and the leader has a loop | Fernandez: lets you change leaders “in a matter of a few seconds,” but it “will not slide through the guides as easily as a nail or needle knot” |
| Nail knot | The line has no loop, or you want a slimmer joint | Needs a tube or tool; SA calls it “a slightly more complicated” knot than the Albright knot, for “a smoother finish” |
| Double surgeon’s knot | Leader to tippet, any conditions | SA calls it “The easiest and fastest” knot for attaching tippet to leader |
| Blood knot | Leader to tippet, when both pieces are close in diameter | Orvis: best where “sections do not vary more than” .002 inch (0.05 mm); more turns to count |
How to connect the leader to the fly line
Method 1: Loop-to-loop
The Orvis Learning Center describes it as the way “to attach a loop leader to the permanent loop on the end of a fly line.” These are Orvis’s three steps.
Pass the loop on the line through the loop on the leader
Orvis’s first step is “Pass the loop on the line through the loop on the leader.” Pull a few inches of the line’s loop through, so it pokes up through the center of the leader’s loop.
Pass the end of the leader through the loop on the line
Orvis’s second step is “Pass the end of the leader through the loop on the end of the fly line.” In an Orvis Learning Center video lesson, the presenter takes the heavy butt section of the leader, doubles it over and passes that through, because “It’s easier than trying to put that skinny little end through there.”
Pull the line and leader apart until the loops seat
Orvis says to pull “until the loops slide together to form what looks like a square knot. You may have to help the knots pass through the loops with your fingers.” The same lesson calls the result “a very, very strong connection, nice and smooth, with no knots to tie.”
Two cautions. First, a loop has to stay small. Fernandez writes that on fly lines with a braided core “loop-to-loop connections work well only if the loop on the fly line is very small.” Second, Orvis News says “Some folks advocate cutting off the integrated loop, but most folks never have a problem” with it, so a factory loop is a choice, not a rule.
Method 2: Nail knot, with a tube or tool
Use SA’s nail knot when the line has no loop. SA says it gives “a smoother finish” than the Albright knot. SA’s steps follow; the five wraps are SA’s count.
Hold the tube and the line end together
Hold the tube and the end of the fly line “with your left thumb and forefinger so about two inches of the fly line and the tube sticks out to the right.”
Form a loop in the heavy end of the leader
With your right hand, form a 2-inch (5 cm) loop in the heavier end of your leader, and pinch it beside the tube and line.
Make five snug wraps
Grasp the short leg of the loop and make “5 snug wraps over the tube and fly line.” SA says the wraps should butt against each other and sit at least a half inch to three-quarters of an inch (about 13 to 19 mm) from the end of the fly line.
Hold the wraps and pass the leader through the tube
Slide your thumb and forefinger forward to hold the wraps, then work the tag end of the leader butt “through the tube from right to left.”
Slide the tube out and semi-tighten
Remove the tube by sliding it to the left, then pull gently on both ends of the leader. SA warns: “Don’t pull on the fly line!”
Moisten, inspect and tighten
“Moisten the knot area,” check that the wraps are smooth, and pull both ends of the leader at once so the knot “bites” into the fly line.
Seat it and trim
Pull hard on the fly line and the leader to seat the knot, then trim the leader tag end and the fly line end.
SA counts five wraps. Fernandez writes “When tying a nail or needle knot, use at least six or seven turns to achieve strength,” and adds that all turns should be “tight and even.” Those are two sources with two counts, so follow your fly-line maker’s instructions if they give one. SA’s own spooling guide, for backing, says “Use 5-7 turns for the Nail Knot.”
If your line has no loop and you want a loop-to-loop joint anyway, SA says a short piece of monofilament butt material can be added with a nail knot, with a Perfection Loop tied on the open end, which then “serves as a permanent loop on the end of the line.”
Related guide: How to Tie a Fishing Lure to Your Line: Snug Knots, Loop Knots and Snaps
How to add tippet to the leader
Double surgeon’s knot (SA)
SA’s version has two passes through the same loop. Follow it as written.
Overlap the leader and the tippet
Lay them side by side so they overlap by about 6 inches (15 cm), with the ends facing opposite directions.
Tie an overhand knot with both
Pinch the standing leader and the tippet tag end with your left thumb and forefinger, and tie an overhand knot “with the leader tag end and the tippet.” Do not tighten it.
Pass the whole tippet through the loop
SA says “The entire length of the tippet must be passed completely through the overhand knot loop.” That holds even though the leader tag end is only about 5 inches (13 cm) long.
Make a second pass through the same loop
Pass “the full length of the tippet and the leader tag end through a second time.”
Moisten, then pull all four ends
Draw the loop down by pulling the leader and tippet together, moisten it, and “Pull all four ends simultaneously to snug the knot tight.”
Trim the tag ends
Blood knot (Orvis)
Orvis calls it the best knot for connecting monofilament “where sections do not vary more than” .002 inch (0.05 mm) in diameter, and says it is “a very clean, smooth knot.” Tim Flagler, credited as producer of MidCurrent’s blood knot video, says its shape “enables it to slip easily through rod guides.” Orvis’s steps:
Cross the two pieces into an X
Cross the two strands “forming an X, leaving 5 to 6 inches of tag end on each side” (13 to 15 cm).
Wind one tag end away from the X
Wind the tag end of one strand around the standing part of the other, “working away from the X,” and keep the loop at the X open by pinching it.
Count the turns for the line you have
Orvis’s page gives three turn counts by diameter: fewer turns for the heaviest monofilament, 5 for the middle range and, for the finest material (0.009 inch (0.23 mm) and smaller), “use 7 turns.” The two heavier ranges are misprinted on that page (it prints the heaviest as bigger than 0.17 inch and the middle as 0.15 to 0.10 inch, which cannot be right), so it gives no usable count for common leader and tippet sizes of about 0.010 to 0.017 inch (0.25 to 0.43 mm). For those, Animated Knots, a knot-tying reference site, says “The strength of the Blood Knot depends on making at least five, and up to seven, turns on each side of the center.” Use that range. Pass the tag end you just wound through the loop at the X.
Repeat on the other side
Wind the second tag end the same number of turns, and pass it “back through the same loop as the first tag end in the opposite direction.”
Moisten and pull the standing parts
Orvis says to make sure the tag ends “stick out from the loop enough so that they don’t slip out,” not to pull on them, to moisten the knot and “pull on both standing parts quickly.” The barrels “should form neat coils; if not, cut the strands and start over.” Trim the tags close.
Mistakes and fixes
| What goes wrong | What to do |
|---|---|
| The knot is dry when you tighten it | SA: “moisten all knots before drawing them tight” (and, for its knots, tighten them slowly; Orvis says to pull the blood knot quickly) |
| You pull on the fly line while semi-tightening a nail knot | SA: “Don’t pull on the fly line!” Pull the leader ends only |
| A loop-to-loop joint will not pass through the tip-top | The loop is too big; Fernandez says the line loop must be “very small” on braided-core lines |
| The blood knot barrels are not neat coils | Orvis: cut the strands and start over |
| You never test the knot | SA: “test every knot by pulling on it” before you fish; it also says “Few knots are 100% of the line’s rated strength” |
Frequently Asked Questions
Q. What is the best knot to tie a leader to fly line?
Sources name no single winner. A loop-to-loop joint takes no knot and lets you swap leaders quickly, and a nail knot is smoother through the guides; Fernandez writes that for floating line “I prefer to attach a leader with either a nail knot, a needle knot, or the loop-to-loop method.”
Q. How do I tie a leader to a fly line with no loop?
Use the nail knot above, with a small tube or a nail-knot tool. SA also says the Albright knot may be used “for the leader to line.”
Q. How do I tie tippet to a fly line leader?
Use the double surgeon’s knot, which SA calls the easiest and fastest, or the blood knot when the two pieces are close in diameter.
Q. What is a fly line leader?
It is the length of tapered monofilament between the fly line and the tippet or fly. MidCurrent’s Tim Flagler says segments of different diameters make “tapered leaders that turn over easily.”
Q. Do I need backing knots for this?
No. Backing goes on the reel and joins the fly line at the other end; this guide stops where the leader begins.
Q. What if I fish a spinning rod instead?
It is a different job. For a spinning outfit, see our guide to putting fishing line on a reel, and our roundup of trout fishing line for monofilament, fluorocarbon and braid on that kind of rod.
Sources (12)
- Scientific Anglers, Fly Fishing Knots Every Fly Fisherman Should Know
- Scientific Anglers, How to Spool a Fly Reel with Backing and Fly Line
- Orvis Learning Center, Loop-Loop Connection Animation
- Orvis Learning Center, Blood Knot Animation
- Orvis Learning Center, Attaching Fly Line To Leader
- Orvis News, Video: Three Ways to Attach a Leader to a Fly Line
- MidCurrent, Making the Connection (Chico Fernandez)
- MidCurrent, Chico Fernandez contributor page
- Animated Knots, Blood Knot
- MidCurrent, How to Tie a Blood Knot
- Washington Department of Fish and Wildlife, Fishing licenses
- Florida Fish and Wildlife, Do I need a license or permit?