The short answer
A first rod setup uses two knots. Thread the line through the guides, tie it to the reel spool with an arbor knot, wind it on, then tie the hook on with an improved clinch knot. If your reel came already spooled, thread the guides from the reel out to the tip, then tie the hook.
“A knot on a fishing rod” means two different knots, one at each end of the line. The arbor knot holds the line to the reel. The improved clinch holds the hook to the line.
Related guide: How to Make a Bamboo Fishing Rod: A Simple Cane Pole From Scratch
These steps are for a spinning reel, the kind most beginners start on. Where the makers and agencies disagree, such as how many turns to wrap, the text names who says what.
What you need
- A spinning rod with the reel mounted. If you are still choosing, our roundup of affordable spinning rods compares rods, and our beginner fishing reel roundup covers reels. The U.S. Fish & Wildlife Service’s beginner pamphlet notes that spinning and spincast tackle is sold in “packages that contain a rod matched with a reel that is already spooled with fishing line.” With one of those, skip to the pre-spooled steps below, then tie on the hook.
- Line that suits the reel. Lew’s, a rod and reel maker, says “Spinning reels perform at their best with fluorocarbon and monofilament lines no heavier than 8-pound test” (about 3.6 kg). The USFWS pamphlet lists “4- to 8-pound-test monofilament fishing line” for a first outfit (about 1.8 to 3.6 kg). Our spinning reel size guide explains reel sizes.
- A hook. The USFWS pamphlet lists “Fish hooks (Number 6–10 size)” for freshwater.
- Scissors or line clippers.
- A helper, or a flat surface. Field & Stream says to have a buddy hold the line spool facing you, or to keep it on a flat surface, label up, while you reel.
Note
The USFWS pamphlet says to ask about a fishing license: “Depending on your age and your state, you may need one to fish legally.” It also says to pick up a copy of your state’s fishing laws (or regulations). Check your state wildlife agency’s rules before you fish.
Thread the line through the guides
The guides are the small rings along the rod. Field & Stream explains why to do this first and to use every guide: the line has to come in to a spinning reel from directly in front of the spool, and running it through all the guides gives it “plenty of room to channel itself straight into the reel.” The end of the line has to come out at the reel, because that is where you tie it.
Pass the line end through the tip guide
Set the filler spool, the spool the line came on, on the floor a few feet in front of the rod tip, label up; it stays there while you wind. Pull some line off it and pass its end through the guide at the very tip of the rod. Field & Stream says: “Thread the line through all of the guides, from top to bottom, all the way down to the reel.”
Keep going down to the guide nearest the reel
Lew’s and Outdoor Life describe running the line through only the guide closest to the reel (with the filler spool beside the reel). Field & Stream warns that threading only the first one or two guides is a common shortcut and that “you can wind up with an uneven fill,” so run the line through every guide.
Tie the line to the spool with an arbor knot
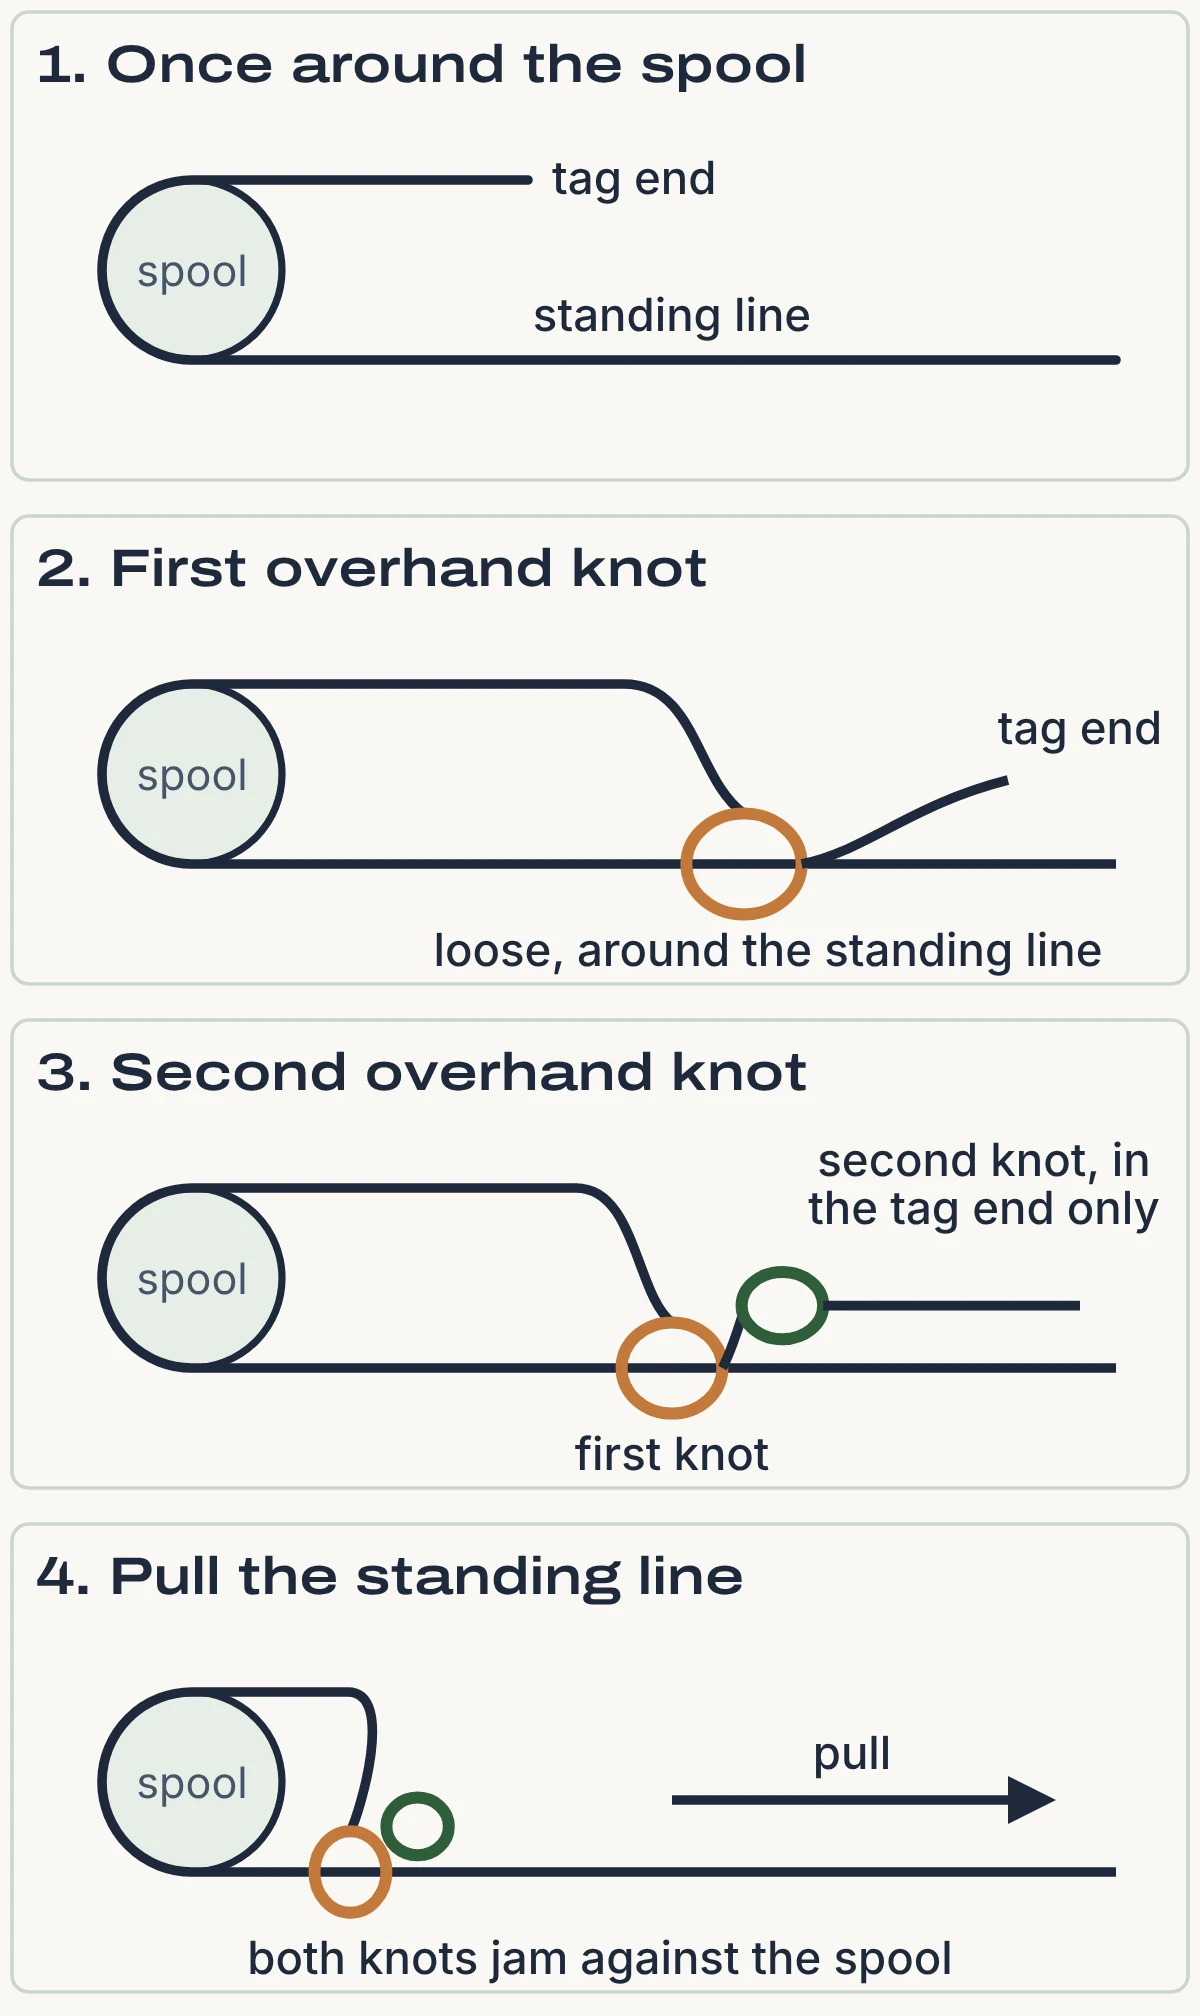
The arbor is the bare centre of the spool. Animated Knots, a knot-instruction site, gives the arbor knot as: “Pass the fishing line round the arbor. With the free end, tie an overhand knot around the line. Then tie a second overhand knot in the free end to act as a stopper. Finally, slide the knots down tight against the arbor.” Sports Illustrated says the knot “works equally well for spinning, baitcating, or even spincast reels.”
Related guide: How to Tie a Tent Knot: Taut-Line Hitch, Half Hitches and Bowline
Open the bail
The bail is the wire arm that swings over the spool. Lew’s says to run the line through the first guide, then open the bail and tie on. Field & Stream says to “open the bail before you tie the line to the spool,” or you will have to redo the knot.
Take the line around the spool
Pass the end of the line around the arbor and bring it back alongside the line that runs to the guides. That running part is the standing line. Leave a tag end of 3 to 4 inches (8 to 10 cm), per Sports Illustrated. Animated Knots’ main steps use one pass, and Berkley’s spooling guide says to “wrap the tag end around the spool twice.” Animated Knots also describes winding two or three times on a highly polished spool and says “The direction of these turns is critical,” so one pass is the simpler start.
Tie the first overhand knot around the standing line
Make a loop with the tag end around the standing line, tuck the tag end through that loop and leave it slack. Sports Illustrated’s wording is: “Tie a loose overhand knot around the main line (not just the spool, but the standing line). Leave it tied loosely for now.”
Tie a second overhand knot in the tag end
Tie it in the tag end alone, close beside the first knot, and pull it tight; Sports Illustrated says to “cinch it down tight.” Animated Knots calls this knot essential: “when the Arbor Knot is tightened the Second Overhand Knot snugs down against the Arbor.”
Pull the standing line
Snug the first knot, then pull the line that runs to the guides. Sports Illustrated says: “The knots will slide together and jam on the spool.” Animated Knots adds that if you tie a slip knot by mistake it will just pull undone.
Trim the tag end
Berkley’s spooling guide leaves about ¼ inch (6 mm) of tag above the second knot and says “this extra line keeps the knot from coming loose.” Keep the trimmings. The USFWS pamphlet says “Fishing line is very dangerous to birds and other wildlife,” and asks you to bring old or tangled line to a tackle store to recycle it.
Wind the line on without twist
Close the bail, as Lew’s does after tying, and start winding. Full detail on baitcasters, spincast reels and braid is in our guide to putting fishing line on a reel. The steps below are the ones that decide whether the line twists.
Set the filler spool so the line comes off counterclockwise
Keep it in front of the rod tip, where it sat for threading. Lew’s says: “Lay the line’s spool on whichever side allows the line to come off of it counterclockwise.” and “If the line comes off clockwise it will twist.” Berkley’s spooling guide says: “I prefer that the line come off the spool counter-clockwise,” because “when you cast a spinning reel, the line comes off clockwise.” Field & Stream puts the idea as “you want to put the line on a reel the same way it will come off the reel.”
Keep tension on the line as you wind
Lew’s says to “run the line through your fingers below the guide and apply firm pressure,” and Berkley’s guide has a helper hold the spool “making sure that they keep plenty of tension on the line.” Outdoor Life says to let the line run through your fingers “to provide some light tension” so it lies flat. Snug, not loose, is the aim. A helper can hold the filler spool facing you instead.
Check for twist after about 15 turns
Lew’s says: “Stop after 15 cranks or so and release the line in your fingers.” If the line twists around itself, “the wrong side of the spool is facing up.” Flip the filler spool over and keep winding.
Stop short of the rim
Lew’s and Field & Stream stop about 1/8 inch (3 mm) below the spool’s edge; Berkley says to “fill the spool within 1/8 to 3/16 of an inch from the edge” (3 to 5 mm).
Cut the line from the filler spool
If you are not tying on a hook yet, Field & Stream says to wrap the end into the reel spool’s line keeper.
Tip
Lew’s says braided line is “so slick that it will slip on the reel” spool, whatever knot you use, and recommends tying braid to a length of monofilament or fluorocarbon on the spool first. Our line-on-a-reel guide covers that backing step.
If your reel came already spooled
A pre-spooled reel has line on it but not through the rod. The Fishing Manual, an independent angling how-to site, gives these steps for a spinning outfit.
Related guide: How to Rig a Fishing Rod: Bobber, Split-Shot, Sliding-Sinker and Surf Rigs
Open the bail and pull off a few feet of line
Pull the line from the reel with the bail open.
Start at the guide nearest the reel
Thread the line through each guide in order, all the way to the tip. The Fishing Manual says not to skip one: “A skipped guide is hard to spot and will ruin your casting and put extra strain on the rod.”
Pull slack through the tip
Once the line reaches the tip, pull an arm’s length of slack through so you have room to tie on the hook. Then close the bail.
The direction differs from the filler-spool method above because here the line already ends at the reel, so you feed it from the reel out to the tip.
Tie on a hook with the improved clinch knot
The USFWS beginner pamphlet teaches the Palomar or the improved clinch for tying a hook to the line. The clinch is the one to learn first here. Sports Illustrated says it is often the first knot beginners learn, and that it is “sometimes called the fisherman’s knot.”
Pass the line end through the hook eye
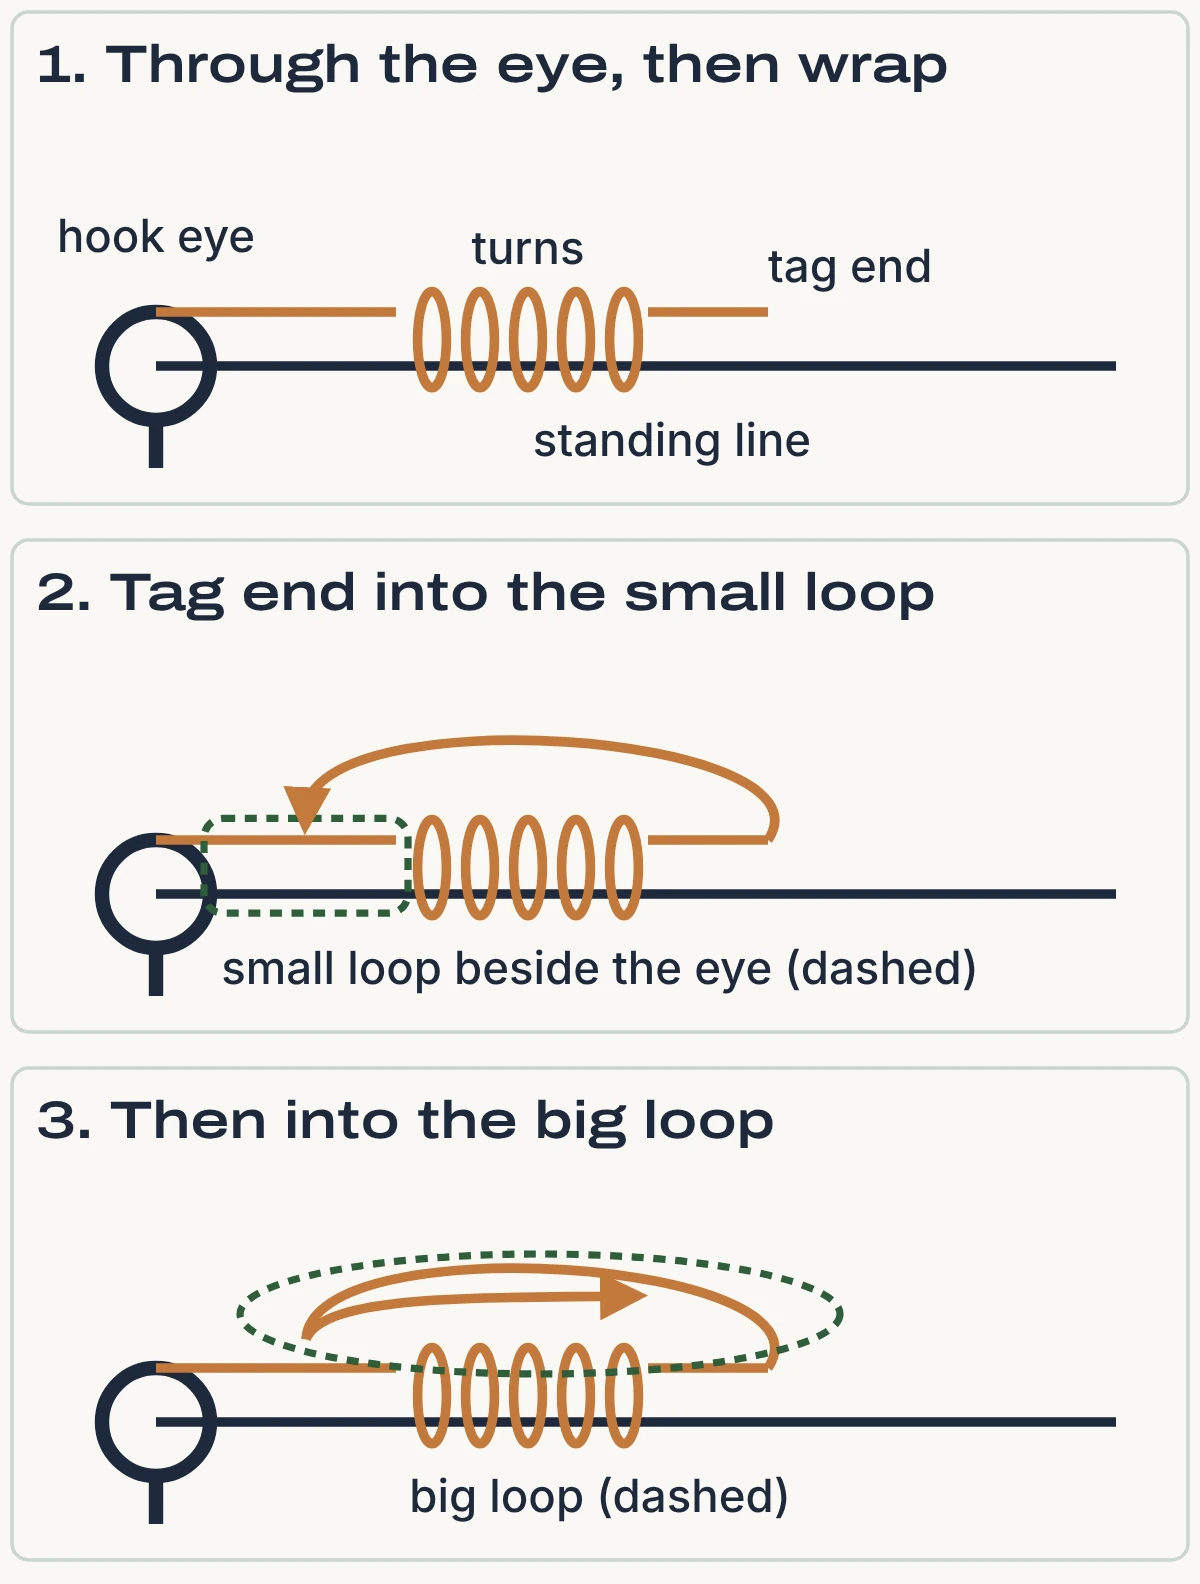
The eye is the small ring at the top of the hook. Leave a tag end of at least 6 inches (15 cm); the Illinois Department of Natural Resources knot leaflet says: “Insert the tag end through the eye, leaving at least 6 inches of line.” The USFWS pamphlet’s safety list says: “Be careful when handling sharp hooks.” To practice casting safely, the pamphlet says to tie on “an inexpensive rubber covered weight called a casting plug” and only later to “Cut off the casting plug and tie on a hook.”
Wrap the tag end around the standing line
The standing line is the part running back to the rod. Wind the turns in a neat spiral, as Animated Knots advises. The sources give different turn counts; the table below lists them.
Pass the tag end through the small loop beside the eye
Utah’s Division of Wildlife Resources says: “Pass the free end of the fishing line through the loop closest to the eye of the hook, lure or swivel.” The USFWS pamphlet says: “Insert the loose end of the line between eye and first loop formed.”
Pass the tag end through the big loop
Take it back through the larger loop that the last pass created. Utah says: “Then, pass the free end of the fishing line through the newly created loop.” The USFWS pamphlet says: “Bring the end through the large second loop formed.” Berkley adds: “Be careful that the coils don’t overlap.”
Wet the knot and draw it tight
The USFWS pamphlet says: “Wet the line and tighten the knot slowly while holding the loose end of the line end between thumb and index finger so the knot is partly closed before it’s secured against the eye.” Illinois DNR adds: “Maintain tension on the tag end and draw the knot tight by pulling on the standing line.” Utah’s reason for wetting is that moisture “reduces friction heat that can cause the fishing line to stretch and weaken.” The USFWS pamphlet’s Palomar steps use the same care and say “Hold the hook carefully” while tightening.
Trim the tag end
Clip it close to the knot and keep the scrap, as in the arbor knot step.
| Source | Turns around the standing line |
|---|---|
| Illinois DNR knot leaflet | Six for light line (2-6 lb), five for medium (8-12 lb), four for heavy (14-20 lb) |
| USFWS beginner pamphlet | Five |
| Utah Division of Wildlife Resources | Five to six |
| Berkley, Fishing Knots 101 | Twist five to seven times |
| Animated Knots | About five; four on heavier line |
| Sports Illustrated | Six |
Reading the table, every source’s count for light and medium line includes five or six turns. Animated Knots and Berkley both say the knot is not recommended over 30-pound test line (about 14 kg), where it gets hard to tie.
Illinois DNR explains why the effort is worth it: “the knot you tie is the weakest point in your line,” and “a good knot will retain more than 90 percent of the line strength.” Utah’s wildlife agency recommends “practice, practice, practice.”
Ready to buy?
If you are still shopping for the rod this line goes on, our roundup of affordable spinning rods compares rods for new anglers.
Mistakes and quick fixes
| Problem | Likely cause | Fix |
|---|---|---|
| Arbor knot pulls undone | A slip knot was tied by mistake, or the second overhand is missing | Animated Knots: a slip knot “will just pull undone” and the second overhand is essential. Retie with both overhand knots. |
| Knot has to be retied | Bail was closed when tying on | Field & Stream: open the bail before tying to the spool. |
| Braid slides on the spool | Braid is slick | Lew’s: tie it to monofilament or fluorocarbon on the spool first. |
| Line corkscrews at the first guide | Filler spool is on the wrong side | Lew’s: flip the filler spool and keep winding. |
| Line sits unevenly on the spool | Line went through only the first guides | Field & Stream: run it through all the guides. |
| Clinch knot looks bunched | Coils overlapped | Berkley: keep coils from overlapping; Animated Knots: wind a neat spiral. Retie. |
Frequently Asked Questions
Q. How do I tie a knot on my fishing rod?
You tie two: the arbor knot ties the line to the reel spool, and the improved clinch ties the hook to the free end. Both are covered step by step above. If your reel came already spooled, thread the guides from the reel out to the tip and skip the arbor knot.
Q. What is the basic fisherman’s knot?
Sports Illustrated says the improved clinch is “sometimes called the fisherman’s knot.”
Q. What is the easiest knot for fishing?
Sports Illustrated says the improved clinch is often the first knot beginners learn, and Utah’s wildlife agency says the same.
Q. How do I tie a knot in fishing line that won’t come undone?
Wrap the right number of turns, wet the knot and pull it down slowly. Illinois DNR says a good knot keeps more than 90 percent of the line strength.
Q. How do I tie a hook and sinker on fishing line?
Tie the hook with the clinch above. The USFWS pamphlet says to “Attach 1 or 2 sinkers or fishing weights to the line, 6 to 12 inches above the hook” (15 to 30 cm).
Q. Which way should the line come off the filler spool?
Lew’s says counterclockwise for a spinning reel, and Berkley’s spooling guide prefers the same.
Sources (12)
- Lew’s, How to Spool a Spinning Reel
- Berkley, Spooling a Spinning Reel
- Berkley, Fishing Knots 101
- Field & Stream, How to Spool a Spinning Reel: An Easy Step-by-Step Guide
- Outdoor Life, How to Spool a Spinning Reel and Avoid Line Twists
- Animated Knots, Arbor Knot
- Animated Knots, Improved Clinch Knot
- Illinois Department of Natural Resources, Knot-Tying Guide
- U.S. Fish & Wildlife Service, Fishing is fun for everyone: it’s easy to learn how
- The Fishing Manual, How to Set Up a Fishing Rod
- Utah Division of Wildlife Resources, Learn to fish: tying the knot
- Sports Illustrated, How to Tie the 3 Fishing Knots Every Angler Needs