The short answer
Cut a straight bamboo cane about 10 feet (3 m) long, with permission, saw it below a joint, trim the side shoots and let it dry for a few weeks, hung with a weight on the tip. Then tie on line, a bobber, split shot and a hook. This makes a cane pole, not a split-cane fly rod.
A cane pole is one bamboo stalk with a line tied to it: no reel, no guides, no glue. Field & Stream’s T. Edward Nickens says “Everyday ordinary, backyard bamboo works just fine for panfish, bass, and small catfish.”
The steps run in the order the work goes: get permission and cut the cane, trim it, dry and straighten it, seal it if you like, then rig the line. A split-cane fly rod, built from planed and glued strips, is a far bigger craft; the last section says where to read about it.
Related guide: How to Rig a Fishing Rod: Bobber, Split-Shot, Sliding-Sinker and Surf Rigs
What you need
- A bamboo cane. Field & Stream says to cut “a straight piece of cane about 10 feet long.”
- A fine-toothed saw. Jim Casada, writing in Sporting Classics Daily, says to use one rather than a hatchet or ax.
- Safety glasses or goggles for sawing, as the Canadian Centre for Occupational Health and Safety advises.
- Pruning shears or a sharp pocket knife for the side shoots (Casada).
- Coarse sandpaper (Casada).
- Cord and a weight of several pounds (a few kg). Casada uses half a cinder block or a couple of bricks.
- Monofilament line. The U.S. Fish & Wildlife Service’s beginner pamphlet lists “4- to 8-pound-test monofilament fishing line” (about 1.8 to 3.6 kg), and Casada gives four-, six- or eight-pound test for panfish.
- A hook (the pamphlet lists “Number 6–10 size”), split shot and a bobber.
- Optional: a clear varnish and a brush. The finish step carries the safety notes.
Before you cut: permission and invasive bamboo
Cutting bamboo is not free everywhere. On private land, ask the landowner. On public land, ask the agency that manages it, because rules differ by forest and district. The Forest Service’s Gifford Pinchot National Forest says Special Forest Products “include, but are not limited to” items such as posts and poles, and that “It is a crime to remove Special Forest Products from the Forest unless otherwise authorized.” The Bureau of Land Management says visitors “can harvest special forest products in reasonable amounts for personal use without a permit,” and directs readers to “Contact your nearest BLM office for more details.” Neither page names bamboo, so ask the local office before you saw.
Some bamboo is invasive. North Carolina State University’s Cooperative Extension (Madison County Center) says “Golden bamboo (scientific name Phyllostachys aurea), also known as fishpole bamboo is an invasive perennial evergreen plant in the grass family,” that it spreads through rhizomes, and that it “can easily be confused with a native plant called giant cane (Arundinaria gigantea).” The page says the species “should avoid being planted at all costs” and sends identification questions to its cooperative extension office; a county extension office near you is the equivalent place to ask if you cannot tell which bamboo you have. It says the plant spreads “through the spreading of rhizomes,” so do not plant cut pieces or root.
Note
You may need a fishing license. The U.S. Fish & Wildlife Service’s pamphlet says: “Depending on your age and your state, you may need one to fish legally.” Check your state wildlife agency’s rules before you fish with the finished pole.
Choose, cut and trim the cane
Pick a straight cane that tapers evenly
Cast & Spear, a fishing blog by Jon Stenstrom, says to “Look for a stalk that is relatively straight and has a gradual, even taper from the thick handle end to the thin tip.” It suggests 10 to 14 feet (3 to 4.3 m) for an all-around pole and 8 feet (2.4 m) for a child. Casada adds that a pole for bream or crappie differs from one for bass, so think about length before you cut.
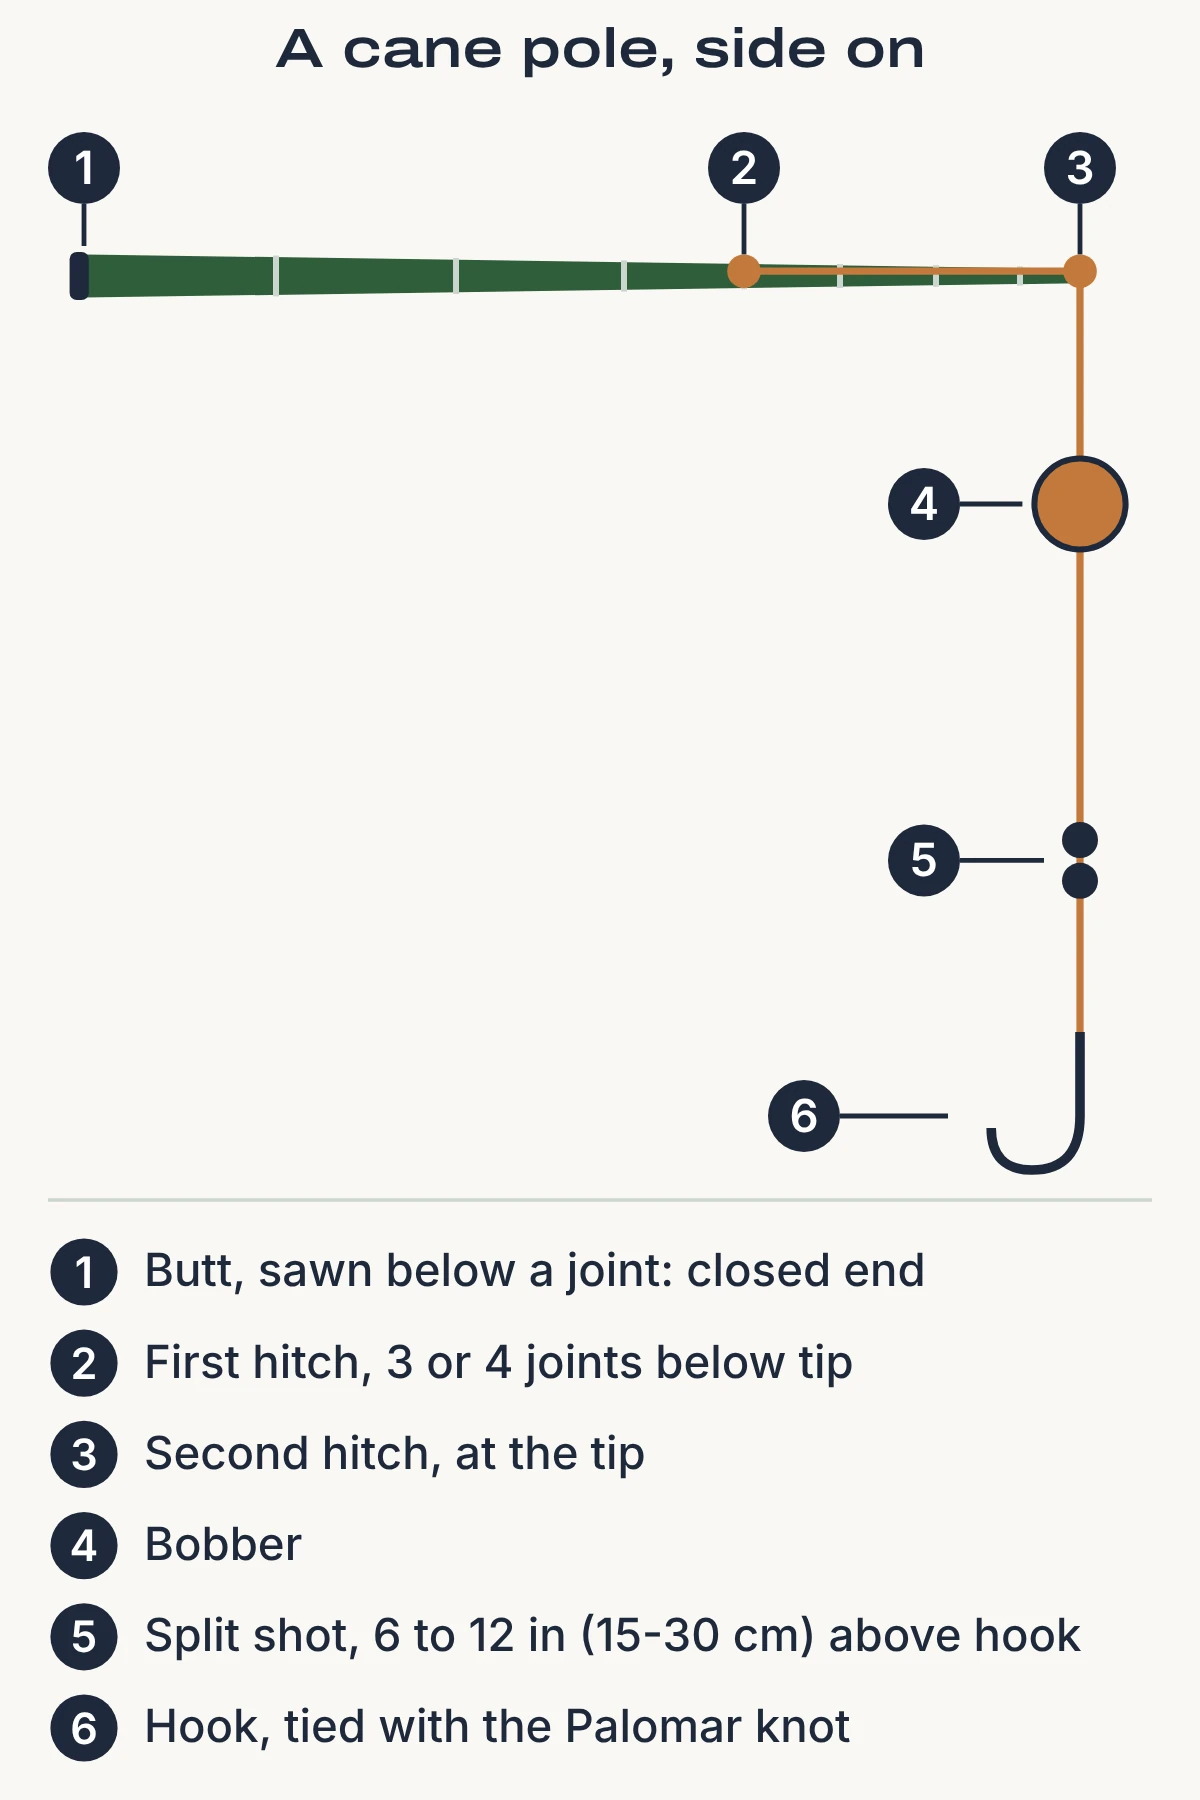
Saw the butt end below a joint
Casada says to cut the cane “close to the ground using a fine-toothed saw,” squarely through a joint with the blade parallel to the ground, and to avoid a hatchet or ax because it “risks a crack or split.” Field & Stream says to saw “through the fat end at the bottom of a joint so the butt end will have a closed cap.” Wear safety glasses or goggles, and follow the Canadian Centre for Occupational Health and Safety’s hand-saw advice: “Hold stock being cut firmly in place,” use a helper to support long stock, and “Start cut carefully and slowly to prevent blade from jumping.”
Trim the side shoots and leaf stems flush
Casada says pruning shears or a sharp pocket knife will work, and to “cut foliage away cleanly and closely.” With a knife, the Missouri Department of Conservation says “Always ask a grown-up for permission before using any knife.” It also says “Always cut away from your body — and away from the hand holding the wood,” and warns that “A dull knife is more likely to slip off of what you’re cutting and slice you instead,” and to “make sure there’s a safety zone around where you work” and “If someone walks into your safety zone, quit cutting.”
Smooth the stubs with sandpaper
Casada uses coarse sandpaper where the foliage was removed, and Cast & Spear says you want a smooth surface “so your fishing line doesn’t get snagged.”
Leave the tip on the thin side, then trim after curing
Casada says you want plenty of limber “give” but not a tip as floppy as a buggy whip, and adds: “it is best to err on the “too small” side, because you can always cut a bit more after curing the pole.” In his text, “too small” is the thin, limber end: you can shorten a tip later but cannot lengthen it. Cast & Spear says to cut the thinnest, weakest portion off “right above a sturdy joint.”
Dry and straighten the cane
Cast & Spear says freshly cut green bamboo “can be prone to rot” and calls curing optional but recommended. The cane-pole guides here dry it by air, not with heat.
Hang the cane with a weight on the tip
Casada says: “Just tie a weight of several pounds to the tip of the cane. Half a cinder building block or a couple of bricks work quite nicely.” The cord stays put because of “slight swelling at the joints,” he says. Hang the pole so the weight is off the ground, and give it “a few weeks to dry and straighten out.” Field & Stream ties a string to the tip, suspends the cane until it “dries to a tan color,” which “could take several weeks,” and says a brick will “straighten out a curved cane fishing pole.” If a bend remains after the weeks are up, a cane that stays badly bent is better replaced with a straighter one.
Seal the pole (optional)
Field & Stream and Cast & Spear do not finish the cane. Casada does: “a couple of coats of clear, protective varnish,” and says polyurethane varnishes provide “greater waterproofing” but “are prone to crack when the pole gets pressure,” so “Oil-based varnishes are a better choice.” Product lines blur that split: Rust-Oleum’s Marine Spar Varnish data sheet lists its resin as “Oil-Modified Urethane.”
Sand, then brush on the varnish you chose, following its label
The label is the instruction for your product. As an example of what one maker writes, Rust-Oleum’s Marine Spar Varnish sheet says “Use in an area with adequate ventilation at all times,” to apply only “between 55-90°F (13-32°C)” and below 85% relative humidity, to “Allow the finish to dry 8 hours before re-coating,” and to recoat “only when previous coats have dried clear and feel hard.” It recommends “A minimum of three coats” (Casada says a couple), and “Allow the finish to dry 24 hours before light use. Wait 3 days before subjecting the surface to normal usage.” The same sheet lists a “Flash Point” of 109°F (43°C), says “Do not apply in direct sunlight,” and points to the product’s safety data sheet: “For additional information, see SDS.” Its sheet says “USE ABOVE THE WATERLINE ONLY” for boat surfaces, so read the can of whatever you buy for the use you plan.
Rig the line
Casada rigs with monofilament; Field & Stream uses 20-pound Dacron (about 9 kg) with a 2-foot (60 cm) monofilament leader. Both keep the line tied to the pole, which Field & Stream says means “the line will remain attached to the pole” if the tip breaks.
Cut the line a few feet longer than the pole
Casada says to “measure off a length a few feet longer than the pole,” so that after the two ties “The remaining line should be a bit longer than the pole.” Cast & Spear says the free line is about the pole’s length “or perhaps a foot longer.” Field & Stream leaves “about 14 to 16 feet” (4.3 to 4.9 m) from the tip of its 10-foot pole, leader included.
Tie the line to the pole twice with clove hitches
Casada says: “Tie it to the pole twice—once three or four joints below the tip, then run the line to the tip and tie it again.” He does not name a knot, and Field & Stream rigs differently (an arbor knot near the handle, then whip-finishing the line to the pole with old fly line), which this article does not teach because no step-by-step source was found. Animated Knots, a knot-instruction site, gives the clove hitch for attaching a line to a pole: “Form a loop in the working end of the rope. Place it over the post. Form a second loop identical to the first. Place it over the post and tighten.” Drop each loop over the tip of the pole and slide it down to just below a joint, which is our reading of Casada’s point that the swelling at the joints stops a cord slipping. The same page warns the clove hitch “slips and, paradoxically, can also bind” and “should be deeply distrusted when used by itself,” and says “To make the hitch secure, additional Half Hitches must be added in the same manner.” So add extra half hitches, each tied as the loops were, at both ties. At the tip the line carries on past the knot to the hook, so leave it hanging from the tip, as the diagram shows.
Tie on the hook with the Palomar knot
The U.S. Fish & Wildlife Service’s pamphlet says “Be careful when handling sharp hooks.” Its Palomar steps: “Double 4 inches of line and pass the loop formed through the eye of the fishing hook.” “Let the hook hang loose. Tie an overhand knot in doubled line. Don’t twist or tighten line.” “Pull the loop far enough to pass it completely over the hook.” “Wet the line. Hold the hook carefully, and pull the loose end with the standing line slowly to tighten the knot. Clip the loose end.”
Add split shot and the bobber
The pamphlet says to attach “1 or 2 sinkers or fishing weights to the line, 6 to 12 inches above the hook” (15 to 30 cm), and that “Most bobbers attach to fishing line with a spring clip.” Casada’s order is split shot, bobber, hook. Our guide to putting a bobber on a fishing line covers clip-on and slip bobbers.
Ready to buy?
If you would rather start with a rod and reel, our roundup of spinning rods under $100 compares eight picks, and our beginners fishing rod combos roundup lists ones that come with a reel.
Common problems
| Problem | Cause the sources give | What the sources say to do |
|---|---|---|
| Cane is curved | — | Hang it with a weight (Casada, Field & Stream) |
| Butt end cracked or split | A hatchet or ax used to cut | Cut with a fine-toothed saw (Casada) |
| Line snags on the pole | Rough stubs where shoots were cut | Sand them smooth (Cast & Spear) |
| Tip too floppy | Tip left thin on purpose before curing (Casada) | Cut a bit more off after curing (Casada) |
| Line lost when the tip breaks | Line tied only at the tip | Tie it to the pole in more than one place (Field & Stream, Casada) |
A split-cane fly rod is a different build
Everything above is a cane pole. A bamboo fly rod is made from split strips of Tonkin bamboo planed to a taper and glued into a hexagon. Chris Lantzy’s overview begins: “It all starts with a stalk, or culm, of Tonkin bamboo cut into two 6’ lengths,” and says “It can take over one hundred hours of work to make a split cane fly rod from start to finish.” Woodworker’s Journal ran a build by Jeff Day, who writes “It cost me a fishing season.” Both are worth reading before you decide. If you want to fly fish without building, our beginner’s guide to fly fishing covers the gear. More how-to guides are in our Skills and How-To section.
Frequently Asked Questions
Q. Is bamboo good for a fishing rod?
Field & Stream says everyday bamboo “works just fine for panfish, bass, and small catfish,” and Casada calls a cane pole “a first-rate fishing tool.” Both mean a simple pole, not a split-cane fly rod.
Q. How long does bamboo take to dry for a fishing pole?
Casada says “a few weeks,” and Field & Stream says it “could take several weeks,” until the cane turns tan.
Q. How long should a cane pole be?
Field & Stream cuts about 10 feet (3 m), Cast & Spear suggests 10 to 14 feet (3 to 4.3 m) for an all-around pole and 8 feet (2.4 m) for a child.
Q. Can I use any bamboo?
Casada says bamboo in various forms grows widely in the United States. North Carolina State’s extension says golden bamboo, also called fishpole bamboo, is invasive, so identify what you have and get permission.
Q. Do I need a license to fish with a homemade pole?
The U.S. Fish & Wildlife Service says “Depending on your age and your state, you may need one to fish legally.” Ask your state wildlife agency.
Q. Can I make a bamboo rod with a reel and guides?
That is a split-cane or other rod build, not the cane pole here. See the section above for where to read about it.
Sources (13)
- Field & Stream, “Cane pole fishing: how to build and rig a bamboo pole” (T. Edward Nickens)
- Sporting Classics Daily, “How to Make Your Own Cane Pole Fishing Rig” (Jim Casada)
- Cast & Spear, “The Ultimate Guide to Making and Fishing with a Bamboo Cane Pole”
- U.S. Fish & Wildlife Service, “Fishing Is Fun for Everyone” (pamphlet)
- NC State Extension, Madison County Center, “On the Lookout for Non-Native Invasive Plants: Golden Bamboo”
- Gifford Pinchot National Forest, “What are Special Forest Products?”
- Bureau of Land Management, “Forest and Wood Product Permits”
- Canadian Centre for Occupational Health and Safety, “Hand Tools – Hand Saw”
- Missouri Department of Conservation, “How To: Use a Pocketknife Safely”
- Animated Knots, “Clove Hitch – Half Hitches”
- Rust-Oleum, “Marine Spar Varnish” technical data sheet
- Chris Lantzy, Custom Rod Maker, “Making the Split-Bamboo Fly Rod”
- Woodworker’s Journal, “How to Make a Bamboo Fly Fishing Rod” (Jeff Day)