The short answer
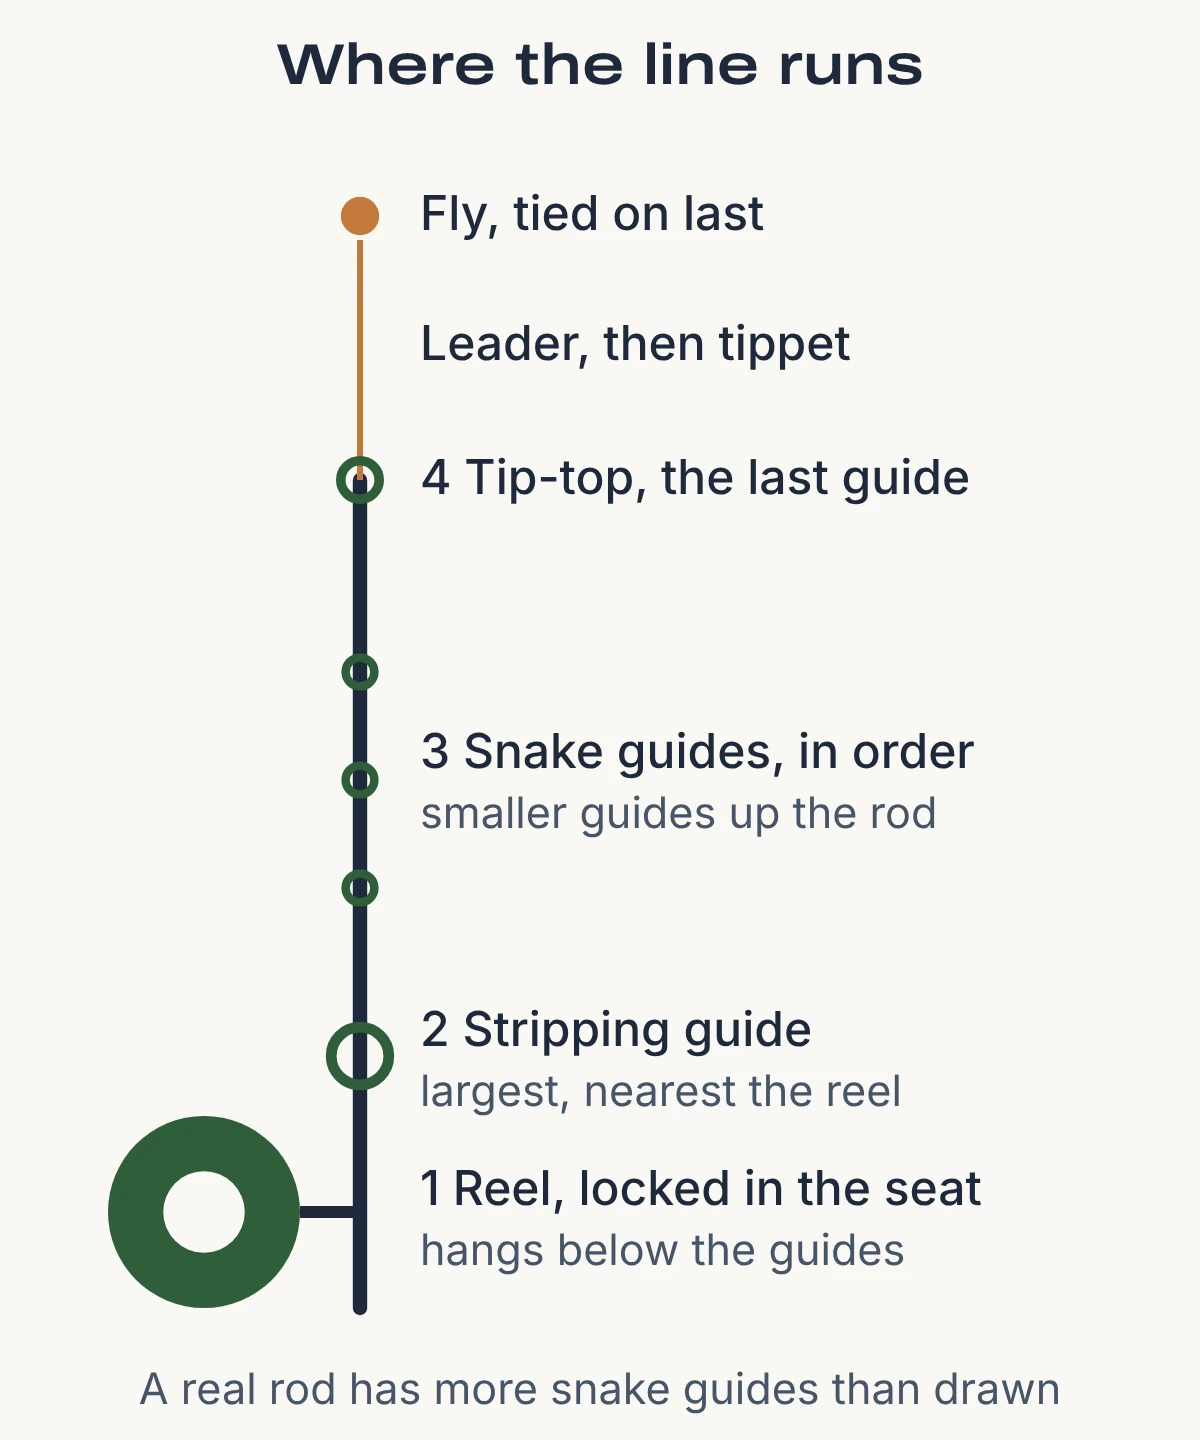
Join the rod sections with the guides in one straight line, tip section last. Lock the reel into the reel seat, fold the fly line and push it through every guide from the largest one by the reel to the tip, then attach the leader, tippet and, last of all, the fly.
Orvis, a fly-fishing maker and retailer, describes rigging a fly rod as “assembling the rod itself, attaching the fly reel, stringing the rod, and adding a leader to your line.” Its Learning Center adds that once those steps are done, “all you need to do is add a fly.”
Related guide: How to Set Up a Tenkara Rod: Line, Tippet and Fly, Step by Step
This guide starts with a reel that already holds backing and fly line. It stays at overview level for the leader and tippet: the knots that join them are separate skills.
What you need
- A fly rod in its tube, a fly reel loaded with backing and fly line, a tapered leader, a spool of tippet, and a fly. For more on gear, see our fishing gear hub. Orvis’s glossary, written by rod-builder Larry Kenney, defines the reel seat as “The threaded metal cylinder on which the reel is secured to the rod.” The reel is the line holder; the rod casts. Peter Kaminsky, an author who writes for Field & Stream and Outdoor Life, says in Fly Fishing For Dummies that the fly rod “gets the fly to the fish. It uses the line to do this.”
- Matching numbers. Scientific Anglers, a fly line maker, says a balanced outfit comes from “matching the numbers on the fly line to the numbers on the fly reel and fly rod,” and that “it is essential to match the fly line weight with the rod weight.” Check the weight printed on the rod blank, on the reel and on the line label before you leave home.
- Line clippers and sunglasses or other eye protection. Illinois Department of Natural Resources (a state agency) says: “Protect the only eyes you have by wearing some kind of glasses. Sunglasses protect your eyes from hooks and the sun’s harmful rays.”
- A fishing license, once you take the outfit to the water. California’s wildlife department, for one state, says “A sport fishing license is required for any person attempting to take fish, mollusks, crustaceans, invertebrates, amphibians, or reptiles in inland or ocean waters,” and sells its resident license to anglers “16 years of age or older.” Ages and rules differ by state, so check your state’s wildlife agency before you go.
Good to know
If your reel has no line on it yet, set it up first. Trident Fly Fishing, a fly shop, says to check the reel’s specifications for the amount of backing: “Most reels have a chart on the box or an informational booklet that tells you how much backing to spool onto the reel.” Some kits ship ready to use: Wild Water Fly Fishing, a fly-fishing retailer, says its “starter packages come with fly line pre-spooled on the reel.” Spooling backing and attaching the line is its own job and not covered here.
Setting up the rod and reel, step by step
Lay the parts out on clean, flat ground
Wild Water says to lay the sections out “in order from handle to tip on a flat surface, not a gravel driveway.” Count the sections before you go any farther. Orvis News starts from the point where you have “picked your fishing spot and parked the truck,” so rig on dry ground at the car.
Join the sections, tip section last
Start with the two bottom sections. Wild Water says to “Align the guides so they form a straight line along the rod,” then slide them together at the ferrule joint. Add the next section the same way and finish with the tip: Wild Water says “Attach the tip section last. The tip is the most fragile part of the fly rod and the most expensive to replace.” Push each section in until it “seats firmly with no wobble or gap”; Wild Water says hand pressure is enough. If a joint feels gritty, Wild Water says to wipe the ferrule ends clean first. Seat them fully: Orvis News says “the rod can come apart in the middle of casting, or worse, you could crack a ferrule.” Your rod’s manual is the last word on its own joints.
Sight down the rod
Looking from the handle toward the tip, every guide should sit in one straight line, as Wild Water’s readiness check says. If one is off, separate that joint, realign it and push it back together.
Check which side the reel handle is on
A fly reel can be set to wind with either hand. An Orvis Learning Center video says “Either way is correct” and that “there’s no right or wrong way,” but that “most right-handed casters are gonna want their reel set up for left-hand wind,” so they don’t have to switch the rod to the other hand to reel. MidCurrent, an online fly-fishing publication, adds that “most fly reels come set up for left-hand retrieve, but changing them to right-hand retrieve is usually a snap” and the manual should have the directions. Not every maker ships left-hand: Wild Water says its reels “ship set to right-hand retrieve by default,” so check yours. Decide before you fish: Orvis says changing later means taking all the line off and switching the drag, and its reeling-technique page puts the job at “less than 15 minutes” to re-spool and switch the drag.
Seat the reel and lock it
Hold the rod with the guides facing up. Wild Water says to “Slide the reel foot into the reel seat so the reel hangs below the guides,” then bring the locking ring up snug and tighten the second ring, if your seat has one. Orvis’s glossary defines the locking ring as “The nut that puts pressure against the sliding hook to keep the reel securely locked in place.” Wild Water says “Hand-tight is enough.” Give the reel a gentle tug: “The reel should not rotate or slide.”
Pull line off the reel and fold it
Wild Water says to “Pull about three feet of fly line off the reel” and “Fold that section back to create a doubled loop at the end.” The fold gives “a doubled loop at the end that pushes through each guide cleanly instead of catching on the edge.”
Thread the line through every guide
Start at the stripping guide. Wild Water describes it as “the guide closest to the reel (the stripping guide, which is the largest one),” and Fly Fishing For Dummies calls it “the first guide that your line passes through as it comes off the reel.” Push the loop through, then “Work toward the tip, threading through each guide in order.” The last one is the tip-top. Wild Water says a skipped guide “puts extra stress on the rod and affects line control,” and that if you miss one, reel the line back in and start again from the stripping guide.
Pull several feet of line past the tip
Once the loop clears the tip-top, Wild Water says to “pull several feet of fly line through so you have some to work with.”
Attach the leader
A leader, MidCurrent says, is “a tapered length of monofilament line that is attached to the fly line on one end and to the fly on the other.” If you buy leaders in a store, MidCurrent says “Commercially constructed leaders have a corresponding loop on one end so that you can connect the two with what is called a loop to loop connection.” That needs a loop on the fly line: you either have what MidCurrent calls “a butt loop put on the end of your fly line by the shop,” or you “buy a fly line that has such a loop built right in.” Fish Untamed, a fishing blog by fly angler Katie Kusold, warns “Many people attach loops the wrong way,” and says a badly formed one is “very clunky and will likely get trapped in your guides every time you fish.” To make the join, Orvis’s animated knot page says: “Pass the loop on the line through the loop on the leader.” Then “Pass the end of the leader through the loop on the end of the fly line.” Then “Pull the line and the leader away from each other, until the loops slide together to form what looks like a square knot.” MidCurrent adds that the connection “must be small and compact to slide through the guides.”
Add a length of tippet
The tippet is the thin end of the system, and the fly ties to it. Orvis says “Always avoid tying flies directly to the end of the leader” and that “Most anglers use 9′ tapered leaders and add a section of tippet between 1′ and 2′ long.” The length depends on the fly: Orvis News says “Use at least two feet of tippet” with dry flies and “about 24 inches” for nymphs and wet flies. For the thickness, Orvis News gives a starting point for dry flies only: “With most dry flies, you can divide the hook size by three to get a rough idea of the right tippet diameter.” The answer is an X size, and its examples are “with a size 12 dry fly, a 3X or 4X tippet; with a size 14 fly, 4X or 5X.” Wet flies and most nymphs “can use a lighter tippet than you would with a dry fly of the same size.” To join tippet to the leader, Orvis News names “a blood knot or surgeon’s knot.” Tying them is outside this guide.
Tie on the fly last, and park it in the hook keeper
Tying the fly on is the final action, as the Orvis Learning Center’s order of jobs implies: “all you need to do is add a fly.” When you are not casting, park the fly in the hook keeper, which Fly Fishing For Dummies calls “A place to hook your fly when the rod is strung up and ready to fish.” Illinois DNR says: “Make sure to look behind you before casting so that your hook will not catch a power line, tree or another person.” Attach it to the tippet with a knot from a tying guide: Orvis News says “A clinch or improved clinch may fail if it’s used to attach a heavy-wire hook to a 5X tippet,” and for that case “use a Trilene knot or nonslip mono loop.” The fly is a hook, so wear your glasses from this step on.
Safety
The National Park Service says: “If you are hooked, learn first aid for removing hooks from the skin and treating the wound. If the hook has deeply penetrated the skin, muscles, tendons, or bone, if it is on the face or near/in the eyes, or if you are bleeding excessively, seek medical treatment immediately.” For a hook or other object in the eye, MedlinePlus (National Library of Medicine) says: “Leave the object in place. Do not try to remove the object. Do not touch it or apply any pressure to it.” and “Get medical help right away. Do not delay.”
A last check before you walk to the water
Wild Water’s readiness check boils the setup down to six points. Run through them once; it takes less than a minute.
| Check | What to look for |
|---|---|
| Rod sections seated | No gaps or looseness at the ferrule joints |
| Guides aligned | A straight line from handle to tip |
| Reel locked | It does not turn or slide when you pull on it |
| Handle side | The handle turns the way you want for your casting hand |
| Line in every guide | Including the tip-top |
| Leader attached | Straight, with no tangles at the fly line joint |
At the water, the NPS fishing safety list says: “Always wear your U.S. Coast Guard approved life jacket when you are on, in, or near the water” and “Be aware of unseen water hazards – use caution when walking or wading in the water.”
What goes wrong, and how to fix it
| What you see | Likely cause | Fix |
|---|---|---|
| Guides zigzag along the rod | A joint twisted out of line | Pull the joint apart straight, realign, and push together |
| A section won’t come apart | Sections seated tight | Trout Unlimited, a conservation nonprofit, says “A straight-line pull is always best,” and suggests a helper or bracing the rod behind your knees; Wild Water says to grip the rod on both sides of the joint, not on the guides |
| Reel wobbles or spins in the seat | The locking ring is loose | Tighten the rings by hand and tug again |
| Line catches on the way through the guides | A single line end, not a folded loop | Fold the line back and thread the loop |
| Rod feels odd when you cast | A guide was missed | Reel the line in and rethread from the stripping guide |
| Handle is on the wrong side | The reel is set for the other hand | Change the retrieve; if you can’t work it out from the manual, MidCurrent says to take the reel to a fly shop |
| Leader joint snags in the guides | The loops were joined the wrong way | Undo it and rejoin the loops using Orvis’s three steps in step 9; Fish Untamed’s photos show the right and wrong way |
If the outfit still will not go together, or you cannot tell whether the line weights match, ask staff at a fly shop. MidCurrent says a nearby shop will “surely do it for free” when you cannot change a reel’s retrieve side yourself.
Is this the same as setting up a spinning rod?
No. Fly Fishing For Dummies says spinning and bait-casting rods “have circular guides the whole way up the rod,” while a fly rod carries snake guides, and “the line that you use with conventional tackle is much thinner” than fly line. A spinning outfit also has a different reel. If a spinning or spincast outfit is what you are after, our roundup of beginner spinning and spincast reels compares those reels, and our guide to putting line on a spinning reel covers spooling one. Neither covers fly reels. For a rod to go with a spinning reel, see our roundup of beginner spinning and spincast rod-and-reel combos.
Related guide: How to Set Up a Baitcaster Reel, From the Box to a Test Cast
Related guide: How to Set Up a Spinning Reel: Mount It, Spool It and Set the Drag
Frequently Asked Questions
Q. Which section of a fly rod do I put together first?
Start with the two bottom sections and add the tip last. Wild Water says the tip is “the most fragile part of the fly rod and the most expensive to replace.”
Q. Do I put the reel on before I string the line?
Yes. Orvis lists “attaching the fly reel” before “stringing the rod,” and the line is threaded from the reel, starting at the stripping guide.
Q. How long does setup take?
Wild Water, a kit seller, says setting up a fly fishing outfit for the first time “takes about 10 minutes.”
Q. Do I need backing?
Backing sits on the reel under the fly line. Trident says to check your reel’s specifications for how much. If the reel already has line on it, you don’t need to add more before this setup.
Q. Does setup change for a fiberglass, nymphing or backpacking rod?
The order of jobs is the same for a typical one-handed rod. Fish Untamed notes that its own method is not for “a rod set up for Euro nymphing or other specialized styles.” Follow the rod maker’s manual for those.
Q. Is a fly reel different from a fly rod?
Yes. The rod is what you cast with, and the reel holds the line. Orvis’s glossary lists the reel seat as the part of the rod that secures the reel.
Sources (19)
- Orvis Fly Fishing Learning Center, Part 1: How to rig your fly rod
- Orvis News, Video Pro Tips: How to Set Up Your Fly Rod
- Orvis News, Pro Tip: Understanding the Anatomy of a Fly Rod
- Orvis Fly Fishing Learning Center, Should You Reel With Your Right or Left Hand
- Orvis, Fly Fishing Reeling Technique
- Orvis, When Should I Add Tippet?
- Orvis News, Pro Tips: A Simple Approach to Leaders
- Scientific Anglers, Putting Together a Balanced Fly Fishing System
- Wild Water Fly Fishing, How to Set Up a Fly Fishing Outfit
- Trident Fly Fishing, How to Set Up a Fly Reel
- Fish Untamed, How to Set Up a Fly Reel
- MidCurrent, Fly Fishing Basics: Lines and Leaders
- MidCurrent, Right- vs. Left-Hand-Retrieve Reels
- Trout Unlimited, How to get a stuck fly rod apart
- Dummies, Anatomy of a Fly Rod (Fly Fishing For Dummies)
- Illinois Department of Natural Resources, Fishing Safety brochure
- National Park Service, Fishing Safety
- MedlinePlus, Eye emergencies
- California Department of Fish and Wildlife, Sport Fishing Licenses and Report Cards